Getting started - initial set up
- Using the RF cable, connect the TV to the TV Aerial wall socket.
- For connecting to the Internet with a wired connection connect a Cat 5/Ethernet cable (not included) from the TV to your broadband modem/router.
- Connect the power cable to the Electrical outlet.
- Insert the batteries supplied into the Remote control.
- Then press Standby button to power on TV.
- You will be now welcomed with the First Time Installation screen.
If it does not appear, on the remote control, please press [MENU] then 8-8-8-8 and the menu will appear.
If you wish to make changes to any of the default settings, use the scroll ▲/▼/◄/► buttons. To exit this menu at anytime, press [EXIT] button.
- Please set desired settings in First Time Installation screen.
Welcome screen - press OK on the remote control to continue to the next screen.
STEP 1 - Set the TV Menu language.
Data collection notice - here you can read information about data collection. You can view more detailed information and personalize data collection settings in „View additional details“ screen.
STEP 2 - Set your country
STEP 3 - Select the location of TV. For home use, please select „Home Mode“. For shop demonstration mode, set „Store Mode“.
STEP 4 - Set type of network connection. If you wish to skip this step and connect TV to network later, please choose option „It‘s OK, I‘ll do it later“.
Set up Netflix - By choosing „Start Netflix“ option you will be able to log in into your Netflix account or create new account. If you do not wish to set up Netflix now, please select „Skip“.
STEP 5 - Choose input source which you want to use. If you have connected RF cable directly to TV, choose „Digital TV“. If you have satellite directly connected to your TV, choose „Satellite“. In case you are using set-top-box, please pick correct input to which it is connected.
- If you selected in last step „Digital TV“ or „Satellite“, you will be asked if you want to tune channels. If you choose “No”, you can tune channels later from SETTINGS/CHANNEL menu. If you choose “Yes”, tuning menu will appear.
Digital TV tuning: In „DVB Antenna“, please choose which type of signal you have. Air (DVB-T) or Cable (DVB-C). Then enter „Auto Scan“ and set your desired settings. Then choose „Auto Tuning“ to start tuning of channels.
Satellite (DVB-S2) tuning: Enter „Satellite Setup“ and in „Antenna Setup“ select satellite which you wish to tune. Then return to previous menu by pressing BACK button on your remote control and choose „Auto tuning“ to start tuning of channels.
NOTE: To shorten tuning time of satellite channels, some countries have preinstalled channel list for most popular satellite in that region. If this is the case for your selected country, you will be asked if you wish to load preinstalled channel list. If you choose “Yes”, satellite channel list will be imported to your TV within few seconds.
TIP: If you are missing channels, the reason for this is likely to be signal strength, you should consider connecting signal booster and re-tuning the TV.
TV Control Stick
The TV control stick is located on the back of the TV. You can use it instead of remote control to control most of the functions of your TV.
While TV is in standby mode:
- short press of control stick - Power On
While watching TV:
- RIGHT/LEFT – volume up/volume down
- UP/DOWN – changes channel up/down
- short press – Displays Menu
- long press – Standby Power Off
While in menu:
- RIGHT/LEFT/UP/DOWN – navigation of cursor in on-screen menus
- short press – OK/Confirm selected item
- long press – Back to previous menu
Sources
From this menu, you can switch your TV input signal to different source/connected device.
Choosing Mode Input/Source
To switch between the different input/connections.
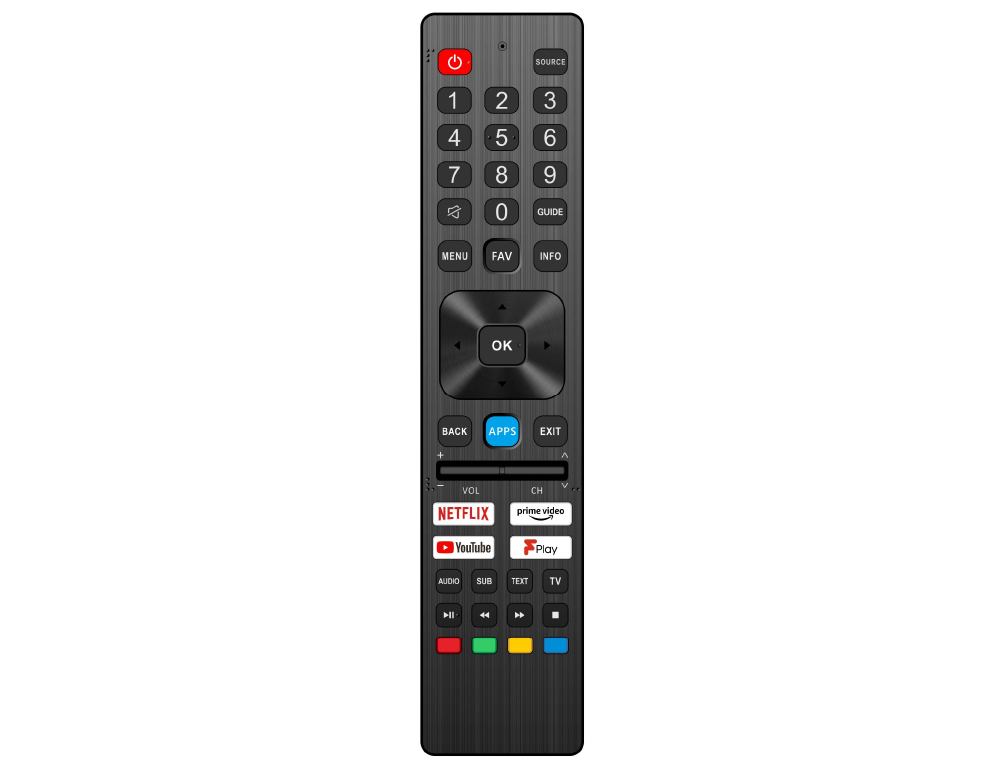
a) Using the buttons on the remote control:
Press [SOURCE/ ] - The source menu will appear.
Press [◄] or [►] to select the input you require.
Press [OK].
b) Using the TV control stick:
Shortly press control stick to enter menu.
Press control stick down and navigate cursor to SOURCES menu.
Shortly press control stick to enter SOURCES menu.
with control stick choose the input/source you require.
By short press of control stick, you will change input/source to the one selected.
Connections
|

|
USB
USB 2.0 input 1, 2, 3
|
|

|
HDMI 1, 2, 3 (ARC)
HDMI2.0-Input 1, 2, 3
|
|

|
SD Card reader
SD Card Input
|
|

|
R/L - Video & YPbPr audio In
Component / Video audio input
|
|

|
Video (CVBS)
VIDEO input
|
|

|
Component / YPbPr
Component HD Input
|
|

|
CI Card IN
CI input
|
|

|
RF In
RF/TV Aerial Input
|
|

|
Sat In
Satellite Input
|
|

|
Digital Optical Audio Out
Digital optical output
|
|

|
RJ 45
Ethernet
|
|

|
HEADPHONES
3.5mm Headphone output
|
|
|
SERVICE
service input only
|
Apps
Contains the most commonly used apps for quick and easy access.
Netflix
World’s leading Internet television network. It is offering thousands of movies and TV shows, including original series, documentaries and feature films. Members can play, pause and resume watching, all without commercials or commitments. You can log in to this application with your existing Netflix account. If you do not have Netflix account yet, you can register via this app or via official Netflix website.
YouTube
Videosharing app allows you to discover and watch originally-created videos.
Note: For Youtube app to work, it is required to have set up correct date and time in TV. For more information about setting up date/time in TV, please refer to the TIME menu chapter of this user guide. Please ensure that your network is not blocking access to YouTube and the speed of your internet connection is fast enough for viewing YouTube content.
AQUOS NET+
Opens the Sharp SMART portal.
Browser
Application for accessing websites via the internet. Navigation in the browser:
Settings
QUICK SETTINGS
PICTURE
SOUND
CHANNEL
Only for devices with built in PVR function
NETWORK
NOTE: For connecting to the Internet with a wired connection, connect a Cat 5/Ethernet cable (not included) from the TV to your broadband modem/router.
NOTE: The connection process may take a few minutes, please be patient. Every time the TV is then powered on it will automatically connect to the network, this may also take some time.
TIME
SYSTEM
HDMI CEC must be supported by connected device.
WARNING: ALL DATA ON THE USB DEVICE WILL BE DELETED.
only for devices with built in PVR function
available only if store mode was selected during first time installation
ABOUT TV
WARNING: Do not turn off the TV’s power until the upgrade is complete!
Channel list
To activate the channel list, press the [OK] button when watching TV. This allows you to quickly select a channel to watch – select the desired channel by using the up and down arrows or the CH +/- buttons on the remote control. Press [OK] to watch.
While in this menu the following two options can be selected:
Note: To move channels, ensure in Channel menu is “LCN” and “Auto update channel list” turned off.
AQUOS NET+
To access the AQUOS NET+ Menu at any time press the NET+ button on the remote control or select it from More Apps menu.
NOTE: Please wait while the TV connects to the Wi-Fi network. It may take a few minutes after you switch on the TV.
Navigate the menu using the scroll ▲/▼/◄/► buttons. To confirm the item you wish to play/view press [OK] button. For ‘one-step’ back press [Menu] button, and to access additional functions use the coloured buttons. To leave AQUOS NET+ press [EXIT] button.
RESET OF USER SETTINGS: If you wish to completely reset all user settings on AQUOS NET+, you must first enter the Settings menu of the portal and select “Reset your device”. Please select YES with cursor and then press OK on the remote control to confirm the reset of the settings.
NOTE: To meet our customers’ demands, we are improving our products. As a result of our ongoing efforts new applications will be added continuously to the AQUOS NET+. Applications and content in AQUOS NET+ can be changed without notice. Some of the functions and content may not be available in your country.
7 Day TV Guide
TV Guide is available in Digital TV mode. It provides information about forthcoming programmes (where supported by the Digital channel). You can view the start and end time of all programmes and on all channels for the next 7 days and set reminders.
- Press [TV GUIDE]. The following 7 Day TV Guide will appear.
- Navigate through the menu using ▲/▼/◄/►.
You can now:
Press [INFO] to view further information about the programme highlighted.
Press the [REC] button on a highlighted programme to use the record function.*
• Record a programme once - press the [REC] button once.
• Set up a daily recording - press the [REC] button twice, a recording will occur every day at this time.
• Set up a weekly recording - press the [REC] button three times, recording will happen every week, on this day and at this time.
Press [GREEN] button on a highlighted programme to set a reminder.
Press  /
/  to view the previous/next day’s list of programmes.
- Press [EXIT] to exit the 7 day TV Guide.
only for models with recording function
USB Record - Digital mode*
Built into this television is a USB record facility. This function is available in Digital mode when used in conjunction with a compatible USB memory stick or USB Hard drive. The benefits of this are as follows:
- Pause live TV and then playback, fast forward and rewind (up to live TV).
- One button record, if you decide you want to record the current programme.
- Easy programmable recording from the 7 day TV Guide
Due to the nature of the product, it is necessary to use a high speed USB memory stick (as the TV reads from and writes to the memory stick at the same time, some memory sticks may not be suitable).
Minimum Specification - USB Memory Stick
Pause Live TV (Time Shift)*
Pausing Live TV is very simple.
- Press the play/pause button and the television will pause and the live content will be recorded. To resume watching press play/pause again.
- Press fast forward to go forward in a recording (i.e. to skip adverts).
- Press fast rewind to go back in a recording (i.e. if you fast forwarded too far).
Tip: When you switch the TV to standby or change channel the Time Shift memory is wiped. To restart time shift you must press play/pause button.
One Button Record
At any point in time you may decide to record the current channel that you are watching. To do this you need to press the [REC] button.
Tip: This television contains one TV tuner, therefore it can only record the channel you are watching or record one channel while the television is in standby mode.
Note: USB record function is only available in Digital TV mode. Due to copyright laws and illegal copying/recording it is not possible to record to/from any other input/output source.
only for devices with built in PVR function
HDR (High Dynamic Range)
HDR video removes some of the limitations of a standard video signal and shows the image built from a wider gamut of colour and brightness.
Notes:
- HDR function will activate automatically if an HDR signal is detected, provided that HDMI 2.0 Format has been set to “Enhanced” in the ‘HDMI Settings’ menu.
- If you are connecting via one of the HDMI ports, the external device must also support HDR, HDMI2.0 and be playing HDR mastered content.
 STANDBY – Switch on TV when in standby or vice versa.
 MUTE – Mute the sound or vice versa.
 – To return to the previous channel viewed.
 – To stop the playback
  – To play in fast rewind mode.
 – To play in fast forward mode.
 – To play/pause