E-instruction manual model: Language: English

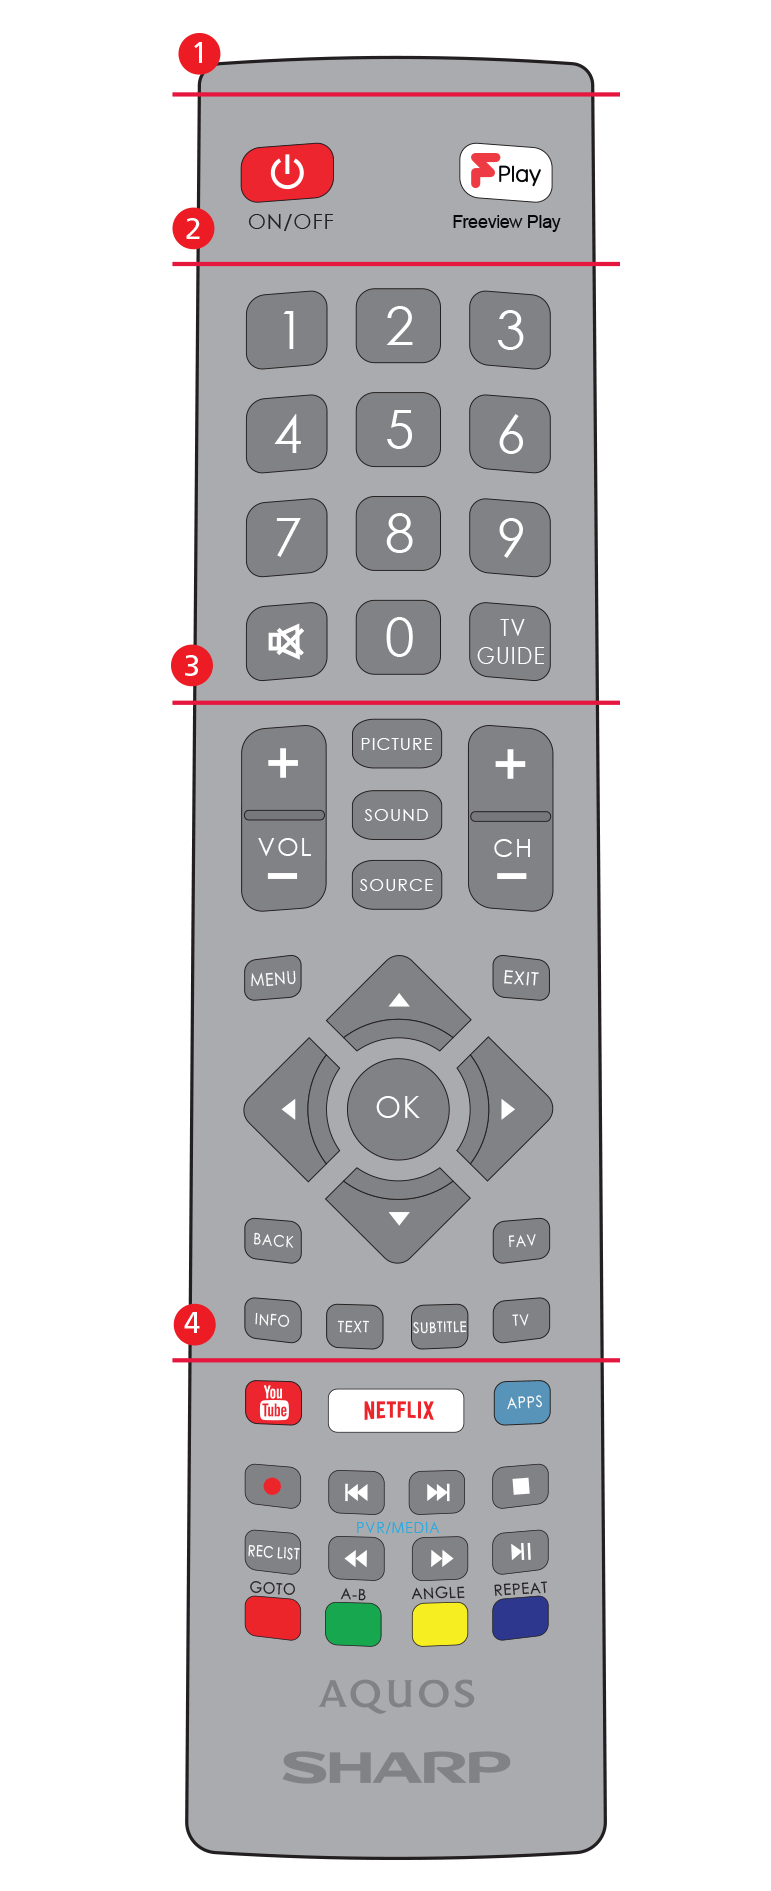
Afstandsbediening (Optie 2)

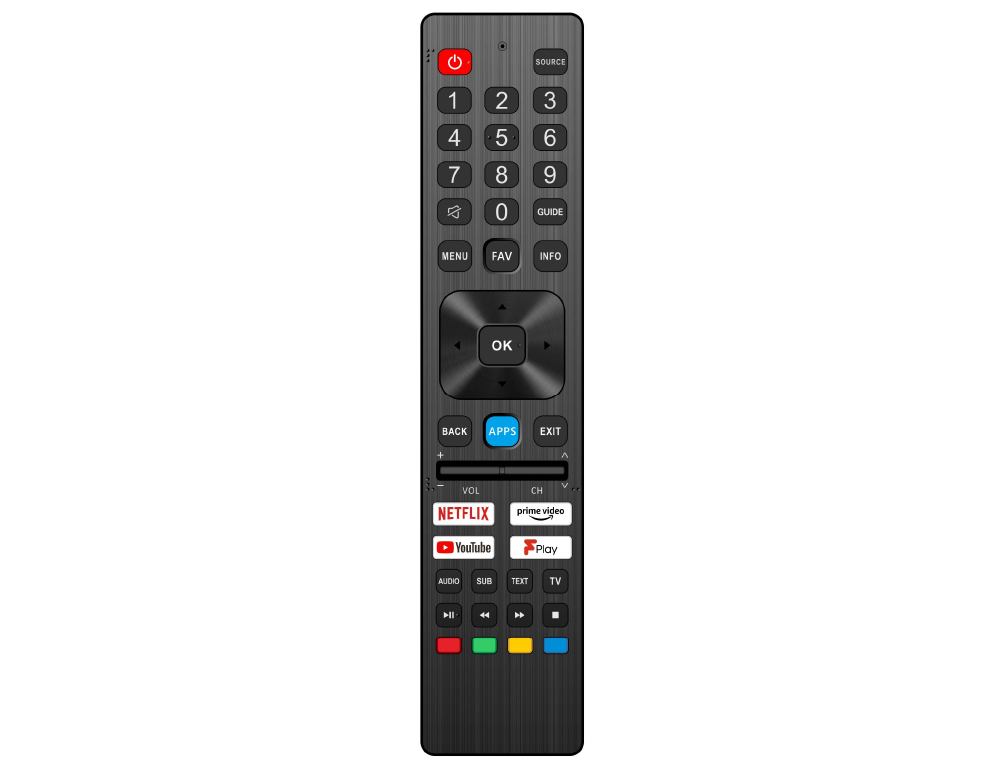
  1. (stand-by) – Schakelt de tv in wanneer in stand-by en andersom.
  2. SOURCE – Toont het menu input/bron.
  3. NUMMERKNOPPEN - Druk op 0–9 om direct een tv-kanaal te selecteren.
  4. (dempen) - Dempt het geluid of schakelt het geluid weer in.
  5. GUIDE - Opent de 7-daagse tv-gids (digitale tv-modus).
  6. MENU - Het menuscherm tonen.
  7. FAV - Toont menu favorieten.
  8. INFO - Druk één keer op de knop om informatie te bekijken over het programma dat u op dat moment bekijkt. Druk nogmaals op de knop om gedetailleerde informatie te bekijken. Druk op ► terwijl het informatiepaneel wordt weergegeven om informatie over het eerstvolgende programma te bekijken.
  9. (//// OK) – Hiermee navigeert u door de menu’s op het scherm en past u de instellingen van het systeem aan uw voorkeuren aan.
  10. BACK - Stap terug in het menu.
  11. APPS – Toont het appmenu.
  12. EXIT – Alle menu’s verlaten.
  13. VOL (+/-) - Kantelen om het volume te verhogen/verlagen.
  14. CH (+/-) - Kantelen om naar het volgende/vorige kanaal in de reeks te schakelen.
  15. NETFLIX - Opent de Netflix-app.
  16. Prime Video - Opent de Prime Video-app.
  17. YouTube - Opent de YouTube-app.
  18. Freeview Play - Opent de Freeview Play-service. Alleen verkrijgbaar in het Verenigd Koninkrijk.
  19. AUDIO - Opent het menu voor audiotracks.
  20. SUB - Schakelt de ondertiteling onderaan het scherm in of uit.
  21. TEXT- Schakelt Teletekst in of uit.
  22. TV - Schakel naar digitale tv bron.
  23. - Media afspelen/pauzeren.
  24. - Snel terugspoelen.
  25. - Snel vooruit spoelen.
  26. - Afspelen onderbreken.
  27. GEKLEURDE KNOPPEN - Om de op dat moment geldende functie uit te voeren.

Fjernbetjening (Valgmulighed 2)

  1. (standby) – Tænd for TV’et, når det er i standby eller sluk det.
  2. SOURCE (kilde) – Viser input/kilde-menuen.
  3. TALKNAPPER – 0–9 for at vælge en TV-kanal direkte.
  4. (lydløs) - slår lyden til eller fra.
  5. GUIDE – Åbner 7-dages TV-guide (Digital TV-tilstand).
  6. MENU - Viser OSD-menuen.
  7. FAV - Viser favoritmenuen.
  8. INFO - Tryk én gang for at få vist oplysninger om det program, du aktuelt ser. Tryk igen for at få vist detaljerede oplysninger. Tryk på ► , mens informationspanelet vises for at se oplysninger om det kommende program.
  9. (//// OK) – Giver dig mulighed for at navigere i menuer på skærmen og justere systemindstillinger til dine præferencer.
  10. TILBAGE – Gå tilbage i menuen.
  11. APPER – Viser App-menuen.
  12. AFSLUT – For at forlade alle menuer.
  13. LYDSTYRKE (+/-) - Øg/sænk lydstyrkeniveauet.
  14. CH (+/-) – vip for at skifte til næste/forrige kanal i rækkefølgen.
  15. NETFLIX – Giver adgang til Netflix-appen.
  16. Prime Video – Giver adgang til Prime Video-appen.
  17. YouTube – Giver adgang til YouTube-appen.
  18. Freeview Play – Giver adgang til Freeview Play-tjenesten. Er kun tilgængelig i Storbritannien.
  19. AUDIO – Åbner menuen for lydspor.
  20. SUB – Tænder/slukker for undertekster nederst på skærmen.
  21. TEXT – Slår Teletekst til/fra.
  22. TV - Skift til digital TV-kilde.
  23. – Afspil/sæt medie på pause.
  24. – Afspil i hurtig tilbagespoling.
  25. – Afspil i hurtig fremadspoling.
  26. – Stop afspilningen.
  27. FARVEKNAPPER_ – Udfører tilsvarende funktion på det pågældende tidspunkt

Dálkové ovládání (Možnost 2)

  1. (pohotovostní) – zapnutí televize v pohotovostním režimu nebo její vypnutí.
  2. SOURCE – zobrazení menu pro vstup/zdroj.
  3. TLAČÍTKA S ČÍSLY 0–9 – slouží k přímému výběru kanálu.
  4. (ztlumení) – ztlumí zvuk nebo ho znovu zapne.
  5. GUIDE – otevře průvodce pořady na 7 dní (digitální režim televize).
  6. MENU – zobrazí menu ODS.
  7. FAV – zobrazí oblíbené položky menu
  8. INFO – jedním stisknutím zobrazíte informace o pořadu, který zrovna sledujete. Opětovným stisknutím zobrazíte podrobné informace. Pokud stisknete ► , když je zobrazen informační panel, zobrazí se informace o následujícím pořadu.
  9. (//// OK) – umožňují pohyb v nabídce na obrazovce a uzpůsobení nastavení systému dle vlastních preferencí.
  10. BACK – o krok zpět v menu.
  11. APPS – zobrazí menu aplikací.
  12. EXIT – odchod z menu.
  13. VOL (+/-) – nakloněním zvýšíte/snížíte hlasitost.
  14. CH (+/-) – nakloněním přepnete na následující/předchozí kanál v pořadí.
  15. NETFLIX – přístup k aplikaci Netflix.
  16. Prime video – přístup k aplikaci Prime video.
  17. YouTube – přístup k aplikaci YouTube.
  18. Freeview Play – přístup ke službě Freeview Play. Dostupné pouze ve Spojeném království.
  19. AUDIO – otevře nabídku pro audio stopu.
  20. SUB – zapne/vypne titulky na spodní straně obrazovky.
  21. TEXT – zapne nebo vypne teletext.
  22. TV – přepnutí na digitální TV zdroj.
  23. – přehrávání/pozastavení médií.
  24. – přehrávání v režimu rychlého přehrávání pozpátku.
  25. – přehrávání v režimu rychlého přehrávání vpřed.
  26. – zastavení přehrávání.
  27. BAREVNÁ TLAČÍTKA – provedení odpovídající funkce v aktuální nabídce.

Daljinski upravljač (2. opcija)

  1. (Stanje pripravnosti) – uključuje televizor kad se nalazi u stanju pripravnosti ili obratno.
  2. SOURCE – prikazuje izbornik za ulaz/izvor.
  3. NUMERIČKE TIPKE – 0–9 za odabir određenog TV kanala.
  4. (prigušivanje) – prigušuje ili uključuje zvuk.
  5. GUIDE – prikazuje 7-dnevni TV vodič (digitalni način rada).
  6. MENU – za prikaz zaslonskog izbornika (OSD).
  7. FAV – za prikaz izbornika favorita.
  8. INFO – pritisnite jedanput za prikaz informacija o programu koji trenutno gledate. Pritisnite ponovo za prikaz detaljnih informacija. Pritisnite ► dok je prikazana ploča s informacijama kako biste pregledali informacije i predstojećim programima.
  9. (//// OK) – omogućuje kretanje po izbornicima na zaslonu i podešavanje postavki sustava.
  10. BACK – povratak za jedan korak/razinu izbornika.
  11. APPS – prikazuje izbornik aplikacija.
  12. EXIT – izlaz iz svih izbornika.
  13. VOL (+/-) – povećavanje/smanjivanje glasnoće.
  14. CH (+/-) – prebacivanje na sljedeći/prethodni kanal na popisu.
  15. NETFLIX - pristup aplikaciji Netflix.
  16. Prime Video - pristup aplikaciji Prime Video.
  17. YouTube - pristup aplikaciji YouTube.
  18. Freeview Play – pristup usluzi Freeview Play. Dostupno samo u UK.
  19. AUDIO – otvara izbornik audiozapisa.
  20. SUB – uključivanje/isključivanje titlova pri dnu zaslona.
  21. TEXT – uključivanje/isključivanje teleteksta.
  22. TV – prebacivanje na izvor digitalne televizije.
  23. – reprodukcija/pauziranje multimedije.
  24. – za reprodukciju u načinu brzog premotavanja.
  25. – za reprodukciju u načinu rada “brzo naprijed”.
  26. – zaustavljanje reprodukcije.
  27. TIPKE U BOJI - izvršavanje odgovarajućih funkcija koje su trenutno dostupne.

Дистанционно управление (Опция 2)

  1. (Режим на готовност) – включване/изключване на телевизора от/в режим на готовност.
  2. SOURCE (Източник) – показване на меню за източника на входен сигнал.
  3. ЦИФРОВИ БУТОНИ (٠–٩) – директен избор на телевизионен канал.
  4. (Без звук) – изключване или включване на звука.
  5. GUIDE (Справочник) – отваряне на седемдневния телевизионен справочник (в цифров режим).
  6. MENU (Меню) – показване на екранно меню.
  7. FAV (Любими)– показване на менюто с любими канали.
  8. INFO (Информация) – натиснете веднъж за преглед на информация за програмата, която се възпроизвежда в момента. Натиснете още веднъж за преглед на подробни данни. Натиснете бутон ►, докато информационният панел е показан, за преглед на информация относно предстоящите предавания.
  9. (//// OK) – управление на различните менюта на екрана и регулиране на системните настройки според предпочитанията на потребителя.
  10. BACK (Назад) – връщане една стъпка назад в менюто.
  11. APPS (Приложения) – показване на меню с приложения.
  12. EXIT (Изход) – изход от всички менюта.
  13. VOL (+/-) – наклонете за увеличаване/намаляване силата на звука.
  14. CH (+/-) – наклонете за преместване на текущия канал със стъпка нагоре или надолу.
  15. NETFLIX – достъп до приложение Netflix.
  16. Prime video – достъп до приложение Prime video.
  17. YouTube – достъп до приложение YouTube.
  18. Freeview Play – достъп до услугата Freeview Play. Предлага се само във Великобритания.
  19. AUDIO (Аудио) – отваряне на меню Аудио записи.
  20. SUB (Субтитри) – включване/изключване на субтитрите в долната част на екрана.
  21. TEXT (Телетекст) – включване/изключване на Телетекста.
  22. TV (Телевизия) – превключване на цифров източник на телевизионен сигнал.
  23. – възпроизвеждане/пауза на мултимедиен файл.
  24. – възпроизвеждане в режим бързо превъртане назад.
  25. – възпроизвеждане в режим бързо превъртане напред.
  26. – прекратяване на възпроизвеждането.
  27. ЦВЕТНИ БУТОНИ – изпълняване на функции от съответното меню.

Telecomando (Opção 2)

  1. (standby) – Liga o televisor quando está em modo de espera (standby) ou vice-versa.
  2. SOURCE (fonte) – Apresenta o menu de entrada/fonte.
  3. BOTÕES NUMÉRICOS - 0-9 para selecionar diretamente um canal de televisão.
  4. (silenciar) – Silencia o som ou vice-versa.
  5. GUIDE (guia) – Abre o Guia de TV de 7 dias (modo de TV digital).
  6. MENU – Para apresentar o menu OSD.
  7. FAV – Para apresentar o menu de favoritos.
  8. INFO – Carregue uma vez para ver informações sobre o programa que está a ver no momento. Carregue novamente para ver informações detalhadas. Carregue em ► enquanto estiver a ser apresentado o painel de informações para ver informações sobre o programa seguinte.
  9. (▲/▼/◄/►/ OK) – Permite-lhe navegar nos menus do ecrã e adaptar as definições do sistema às suas preferências.
  10. BACK (voltar) – Voltar atrás um passo no menu.
  11. APPS (aplicações) – Apresenta o menu das aplicações.
  12. EXIT (sair) – Sai de todos os menus.
  13. VOL (+/-) – Incline para aumentar/reduzir o nível de som.
  14. CH (+/-) – Incline para mudar para o canal seguinte/anterior da sequência.
  15. NETFLIX – Aceda à aplicação Netflix.
  16. Prime video – Aceda à aplicação Prime video.
  17. YouTube – Aceda à aplicação YouTube.
  18. Freeview Play – Aceda ao serviço Freeview Play. Apenas disponível no Reino Unido.
  19. ÁUDIO – Abre o menu de faixas de áudio.
  20. SUB – Liga/desliga as legendas na parte de baixo do ecrã.
  21. TEXT – Liga/desliga o teletexto.
  22. TV – Muda para uma fonte de televisão digital.
  23. – Reproduzir/fazer uma pausa no conteúdo multimédia.
  24. - Para reproduzir em modo de retroceder rápido.
  25. - Para reproduzir em modo de avançar rápido.
  26. – Parar a reprodução.
  27. BOTÕES DE COR – Executa a função correspondente no momento.

Komma igång - första inställningarna

  1. Med hjälp av RF-kabeln, anslut din TV till vägguttaget för antennen.
  2. För att ansluta till Internet med en kabelanslutning, anslut en Cat 5/Ethernet-kabel (medföljer ej) från TV:n till ditt bredbandsmodem/router.
  3. Anslut nätkabeln till eluttaget.
  4. Sätt i de medföljande batterierna i fjärrkontrollen.
  5. Tryck sedan på standby-knappen för att slå på TV:n.
  6. Du kommer nu att välkomnas med skärmen Förstagångsinstallation.
    Om den inte visas, tryck på [MENU] på fjärrkontrollen och sedan 8-8-8-8 och menyn kommer att visas.
    Om du vill göra ändringar i någon av standardinställningarna använder du bläddringsknapparna ▲/▼/◄/►. För att lämna denna meny när som helst, tryck på knappen [EXIT].
  7. Ställ in önskade inställningar på skärmen FÖRSTAGÅNGSINSTALLATION.
    Välkomstskärm - tryck på [OK] på fjärrkontrollen för att fortsätta till nästa skärm.
    STEG 1 - Ställ in TV-menyspråket.
    Meddelande om insamling av data - här kan du läsa information om insamling av data. Du kan se mer detaljerad information och anpassa inställningar om datainsamling på skärmen „Se ytterligare detaljer“.
    STEG 2 - Ange ditt land.
    STEG 3 - Välj platsen för TV:n För hemanvändning, välj „Hemläge“. För butiksdemonstrationsläge, ställ in „Butiksläge“.
    STEG 4 - Ange typ av nätverksanslutning. Om du vill hoppa över detta steg och ansluta TV:n till nätverket senare, välj „Det är OK, jag gör det senare“.
    Ställa in Netflix - Genom att välja alternativet „Starta Netflix“ kommer du att kunna logga in på ditt Netflix-konto eller skapa ett nytt konto. Om du inte vill ställa in Netflix nu, välj „Hoppa över“.
    STEG 5 - Välj ingångskälla som du vill använda. Om du har anslutit RF-kabel direkt till TV:n, välj „Digital TV“. Om du har satellit direkt ansluten till din TV, välj „Satellit“. Om du använder set-top-box, välj rätt ingång till vilken den är ansluten.
    Om du i sista steget valde ”Digital TV” eller ”Satellit”, blir du ombedd om du vill ställa in kanaler. Om du väljer ”Nej”, kan du ställa in kanaler senare från menyn Inställning/Kanal. Om du väljer ”Ja”, visas inställningsmenyn.
    Digital TV-inställning: I ”DVB-antenn”, välj vilken typ av signal du har. Luft (DVB-T) eller Kabel (DVB-C). Ange sedan „Autoskanning“ och ange önskade inställningar. Välj sedan ”Automatisk inställning” för att starta inställning av kanaler.
    Satellitinställning (DVB-S2): Ange „Satellitinställning“ och i „Antennkonfiguration“ välj satellit som du vill ställa in. Gå sedan tillbaka till föregående meny genom att trycka på [BACK] knappen på fjärrkontrollen och välj „Automatisk inställning“ för att starta inställning av kanaler.
OBS: För att korta inställningstiden för satellitkanaler, har vissa länder förinstallerad kanallista för de flesta populära satelliter i denna region. Om detta är fallet för ditt valda land, kommer du att bli tillfrågad om du vill ladda den förinstallerade kanallistan. Om du väljer “Ja”, kommer satellitkanallistan att importeras till din TV inom några sekunder.
TIPS: Om du saknar kanaler, kommer sannolikt signalstyrkan att vara orsaken till detta, då bör du överväga att ansluta signalförstärkare och göra en ny inställning på din TV.

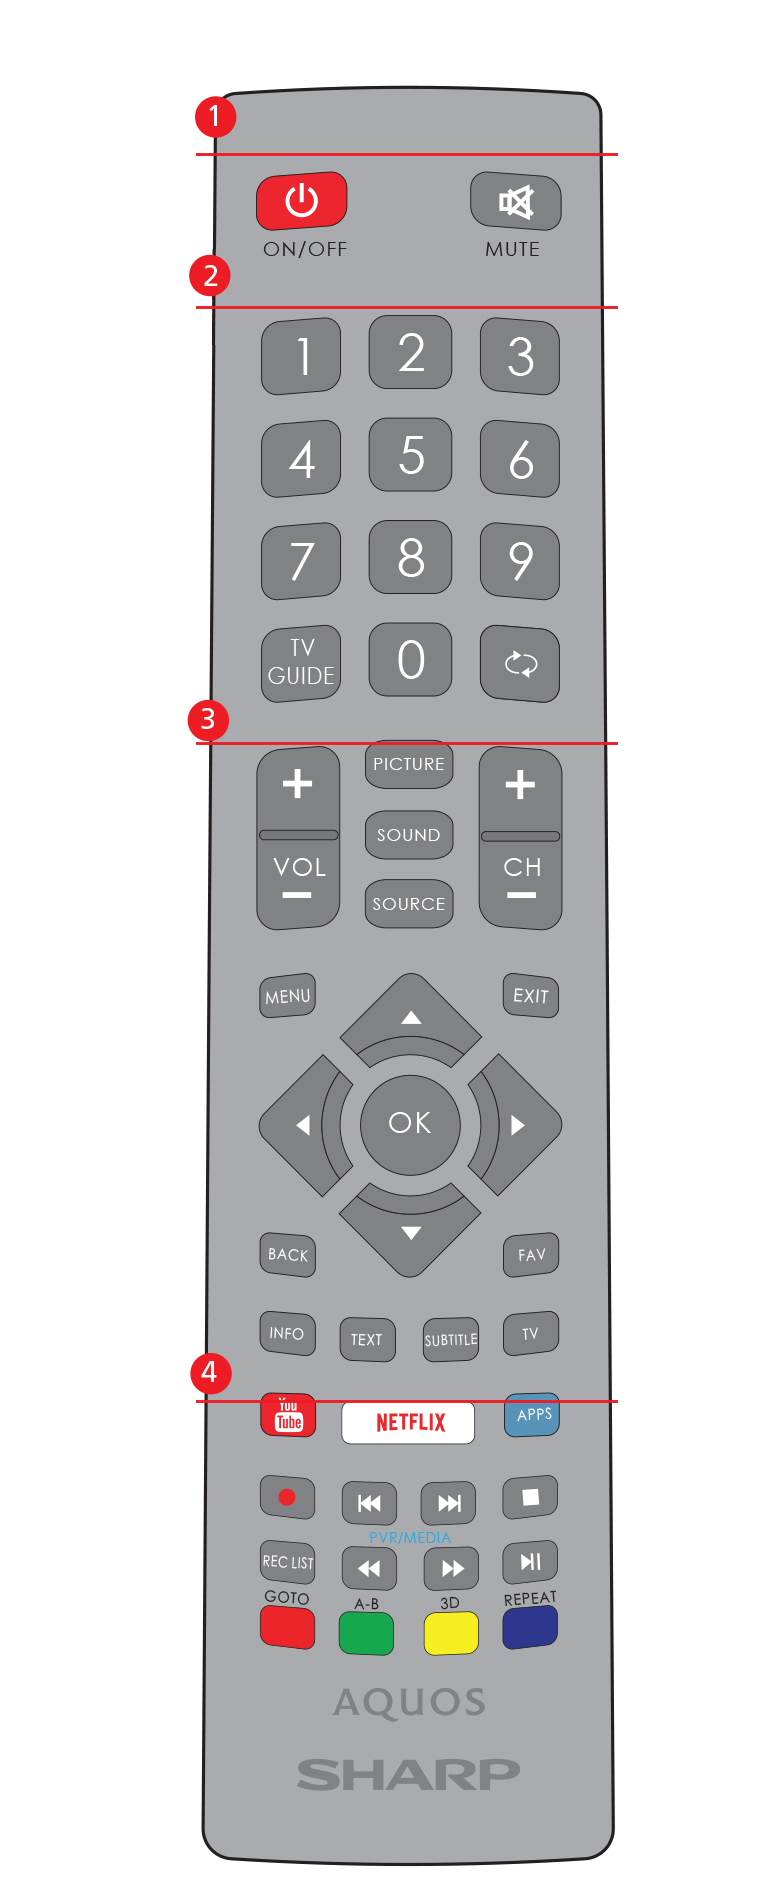
Fjärrkontroll

  1. STANDBY – Slå på TV:n när den är i standby eller vice versa.
  2. MUTE – Stäng av ljudet eller vice versa.
  3. 0 – 9 – för att välj en TV-kanal direkt.
  4. TV GUIDE – Öppnar 7 dags TV-guiden (digitalt läge).
  5. För att återgå till föregående visad kanal.
  6. PICTURE – Bläddrar genom bildlägen.
  7. VOL ▲/▼ För att öka / minska ljudnivån.
  8. CH ▲/▼ För att öka eller minska den kanal som visas.
  9. SOUND – Bläddrar genom ljudlägen.
  10. SOURCE – För att visa ingång/källmenyn.
  11. MENU – För att visa OSD-menyn.
  12. EXIT – För att avsluta alla menyer.
  13. (▲/▼/◄/►/ OK) – Gör att du kan navigera i menyerna på skärmen och justera systeminställningarna efter dina önskemål.
  14. BACK – Tillbaka till föregående meny.
  15. FAV – För att visa favoritmenyn.
  16. INFO – Tryck en gång för nuvarande/nästa kanalinformation. Tryck två gånger för programinformation om aktuellt program.
  17. TEXT – Text-TV-läge - Om du vill se text-TV.
  18. SUBTITLE – Om du vill växla dialogen längst ned på skärmen (på/av).
  19. TV – Byt till digital TV-källa.
  20. YouTube – Visar YouTube-applikationen
  21. NETFLIX – Visar NETFLIX-applikationen
  22. SMART – Visar SMART Portal menyn.
  23. Rec1 Videoinspelning.
  24. För att starta det aktuella kapitlet.
  25. För att gå framåt till nästa kapitel.
  26. För att stoppa uppspelningen.
  27. Rec List1 Öppnar listan över inspelningar.
  28. För att spela i snabbspola bakåt läge.
  29. För att spela i snabbspola framåt läge.
  30. För att spela upp/pausa.
  31. FÄRGKNAPPAR – Ytterligare text-TV och OSD-funktioner.

    1 - tillgängligt endast med videofunktion

Applications menu

Applications Guide

Note:The position of apps may vary depending on your TV set.
Note:The applications available will be different depending if the set is a Freeview Play model. Refer to the application list.
Note: HDR is supported on apps such as Netflix and YouTube, and only works if the data being streamed contains HDR data.

Applications menu

Note: Some Apps, such as Netflix, require a monthly subscription. This is not included with the purchase of your TV set.
Note: The appearance and functionality of apps may vary depending upon the revision of the app and the platform it is designed to be used on. On-demand players may also change depending upon the region in which the set is tuned into.

Applications menu

Applications Guide

Note:The position of apps may vary depending on your TV set.
Note:The applications available will be different depending if the set is a Freeview Play model. Refer to the application list.
Note: HDR is supported on apps such as Netflix and YouTube, and only works if the data being streamed contains HDR data.

Applications menu

Note: Some Apps, such as Netflix, require a monthly subscription. This is not included with the purchase of your TV set.
Note: The appearance and functionality of apps may vary depending upon the revision of the app and the platform it is designed to be used on. On-demand players may also change depending upon the region in which the set is tuned into.

TV Menu Operation

SETTINGS MENU

Quick settings menu

Playback files from Record list
  • Press [RED] to delete a selected recording.
  • Press [GREEN] to sort the items in the record list by date.
  • Press [YELLOW] to sort the items in the record list by name.
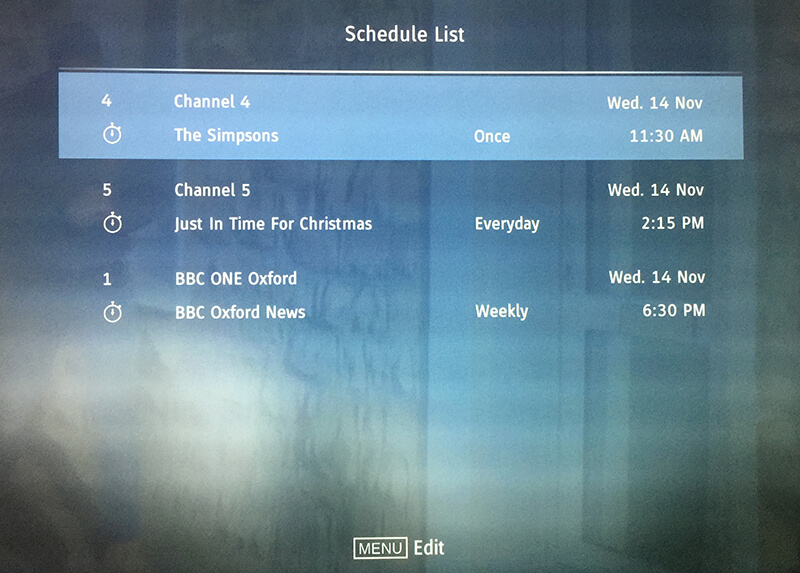
  • Press [BLUE] to enter the schedule list.
Note: Recording is only possible when a USB stick is plugged in and formatted at FAT32. VIsit the ‘USB RECORDING’ page for more information.

Picture Menu

For complete control of your picture settings, enter the ‘Picture’ menu to set up the following adjustments. These will allow you to enhance your viewing experience and utilise the full capability of the television.
  • Auto
  • 16:9
  • 4:3
  • Zoom 1
  • Zoom 2
Expert Settings
Use these adjustment settings to improve the picture in more detail.
Noise Reduction Off, Low, Medium, High.
Gamma Changes the range of the colour reproduction. Low, Medium and High.
Active Contrast Allows for the contrast level to be adjusted automatically depending on picture content. ‘ON’ or ‘OFF’.
Backlight Switches optimization of the backlight and contrast of the picture. Range: 1-100
Red Adjust the amount of red in the picture. Range: 1-100
Green Adjust the amount of green in the picture. Range: 1-100
Blue Adjust the amount of blue in the picture. Range: 1-100
CMS Hue This is a standard to adjust the colour either more reddish or more bluish in tone. R/G/B/C/M Range: -63 to 63
CMS Value A higher value makes the image brighter. A lower value makes the image darker. R/G/B/C/M Range: -32 to 31
CMS Saturation Increases or decreases the saturation of a selected colour. R/G/B/C/M Range: 0 to 15

SOUND MENU

For complete control of your audio settings, enter the ‘Sound’ menu to set up the following adjustments. These will allow you to enhance your listening experience and expand the full capability of the television.

Channel menu

  • Terrestrial Digital Television
  • Cable Digital Television
  • Satellite Digital Television
  • Analogue Television
Important: To receive Freeview/Saorview channels, in particular HD channels, you will need a Digital TV aerial and be in a good Freeview/Saorview coverage area. You can check the coverage for your area at www.freeview.co.uk or www.saorview.ie
Note: Any Freeview HD channels found during tuning will be placed in channel positions above 100. For example, 101 (BBC1 HD) 102 (BBC2 HD) etc.
Note: Freeview channels are only available in the UK, Saorview channels are only available in the ROI.
Signal Information
Note: If channels are tuned in on satellite, other tuning modes are not possible.

NETWORK menu

Set up and control your network and internet access here. There are two ways to connect to your local network, in most cases this will be the router used to connect to the internet.
IPv4
IPv6

Time Menu

Any time related function can be set or seen here.

System Menu

Set up system control options in this menu.
Language
Note: Only languages which are being transmitted can be selected.
Lock
HDMI CEC
Advanced Settings

About TV

ABOUT TV

Select other input data source from this menu:
Note: If you experience a playback issue, please ensure the files being used are the correct format (example - the picture plays but no sound) See the ‘Compatible file types for USB playback’ section at the rear of these Operating Instructions.
Note: If your smartphone or tablet does not include mirroring, it may be possible to connect a suitable cable from your device directly to one of the HDMI inputs on the rear of the TV. Suitable cables for your device should be available from a local electronics retailer.
Note: USB extension cables are not recommended as they can cause a reduction in picture/audio quality and stoppages during play back of USB content.

Media menu

Miracast (Screen mirroring)

Note: Many Android and Windows devices support screen mirroring. For Apple devices, you need a separate Apple TV box to allow screen mirroring onto non Apple products.
Note: If your smartphone or tablet does not include mirroring, it may be possible to connect a suitable cable from your device directly to one of the HDMI inputs on the rear of the TV. Suitable cables for your device should be available from a local electronics retailer.

Fjärrkontroll

  1. STANDBY – Slå på TV:n när den är i standby eller vice versa.
  2. MUTE – Stäng av ljudet eller vice versa.
  3. 0 – 9 – för att välj en TV-kanal direkt.
  4. TV GUIDE – Öppnar 7 dags TV-guiden (digitalt läge).
  5. För att återgå till föregående visad kanal.
  6. PICTURE – Bläddrar genom bildlägen.
  7. VOL ▲/▼ För att öka / minska ljudnivån.
  8. CH ▲/▼ För att öka eller minska den kanal som visas.
  9. SOUND – Bläddrar genom ljudlägen.
  10. SOURCE – För att visa ingång/källmenyn.
  11. MENU – För att visa OSD-menyn.
  12. EXIT – För att avsluta alla menyer.
  13. (▲/▼/◄/►/ OK) – Gör att du kan navigera i menyerna på skärmen och justera systeminställningarna efter dina önskemål.
  14. BACK – Tillbaka till föregående meny.
  15. FAV – För att visa favoritmenyn.
  16. INFO – Tryck en gång för nuvarande/nästa kanalinformation. Tryck två gånger för programinformation om aktuellt program.
  17. TEXT – Text-TV-läge - Om du vill se text-TV.
  18. SUBTITLE – Om du vill växla dialogen längst ned på skärmen (på/av).
  19. TV – Byt till digital TV-källa.
  20. YouTube – Visar YouTube-applikationen
  21. NETFLIX – Visar NETFLIX-applikationen
  22. NET+ – VisarAQUOS NET+ menyn.
  23. Rec1 Videoinspelning.
  24. För att starta det aktuella kapitlet.
  25. För att gå framåt till nästa kapitel.
  26. För att stoppa uppspelningen.
  27. Rec List1 Öppnar listan över inspelningar.
  28. För att spela i snabbspola bakåt läge.
  29. För att spela i snabbspola framåt läge.
  30. För att spela upp/pausa.
  31. FÄRGKNAPPAR – Ytterligare text-TV och OSD-funktioner.

    1 - tillgängligt endast med videofunktion

TV Menu Operation

SETTINGS MENU

Quick settings menu

Playback files from Record list
  • Press [RED] to delete a selected recording.
  • Press [GREEN] to sort the items in the record list by date.
  • Press [YELLOW] to sort the items in the record list by name.
  • Press [BLUE] to enter the schedule list.
Note: Recording is only possible when a USB stick is plugged in and formatted at FAT32. VIsit the ‘USB RECORDING’ page for more information.

Picture Menu

For complete control of your picture settings, enter the ‘Picture’ menu to set up the following adjustments. These will allow you to enhance your viewing experience and utilise the full capability of the television.
  • Auto
  • 16:9
  • 4:3
  • Zoom 1
  • Zoom 2
Expert Settings
Use these adjustment settings to improve the picture in more detail.
Noise Reduction Off, Low, Medium, High.
Gamma Changes the range of the colour reproduction. Low, Medium and High.
Active Contrast Allows for the contrast level to be adjusted automatically depending on picture content. ‘ON’ or ‘OFF’.
Backlight Switches optimization of the backlight and contrast of the picture. Range: 1-100
Red Adjust the amount of red in the picture. Range: 1-100
Green Adjust the amount of green in the picture. Range: 1-100
Blue Adjust the amount of blue in the picture. Range: 1-100
CMS Hue This is a standard to adjust the colour either more reddish or more bluish in tone. R/G/B/C/M Range: -63 to 63
CMS Value A higher value makes the image brighter. A lower value makes the image darker. R/G/B/C/M Range: -32 to 31
CMS Saturation Increases or decreases the saturation of a selected colour. R/G/B/C/M Range: 0 to 15

SOUND MENU

For complete control of your audio settings, enter the ‘Sound’ menu to set up the following adjustments. These will allow you to enhance your listening experience and expand the full capability of the television.

Channel menu

  • Terrestrial Digital Television
  • Cable Digital Television
  • Satellite Digital Television
  • Analogue Television
Important: To receive Freeview/Saorview channels, in particular HD channels, you will need a Digital TV aerial and be in a good Freeview/Saorview coverage area. You can check the coverage for your area at www.freeview.co.uk or www.saorview.ie
Note: Any Freeview HD channels found during tuning will be placed in channel positions above 100. For example, 101 (BBC1 HD) 102 (BBC2 HD) etc.
Note: Freeview channels are only available in the UK, Saorview channels are only available in the ROI.
Signal Information
Note: If channels are tuned in on satellite, other tuning modes are not possible.

NETWORK menu

Set up and control your network and internet access here. There are two ways to connect to your local network, in most cases this will be the router used to connect to the internet.
IPv4
IPv6

Time Menu

Any time related function can be set or seen here.

System Menu

Set up system control options in this menu.
Language
Note: Only languages which are being transmitted can be selected.
Lock
HDMI CEC
Advanced Settings

About TV

ABOUT TV

Select other input data source from this menu:
Note: If you experience a playback issue, please ensure the files being used are the correct format (example - the picture plays but no sound) See the ‘Compatible file types for USB playback’ section at the rear of these Operating Instructions.
Note: If your smartphone or tablet does not include mirroring, it may be possible to connect a suitable cable from your device directly to one of the HDMI inputs on the rear of the TV. Suitable cables for your device should be available from a local electronics retailer.
Note: USB extension cables are not recommended as they can cause a reduction in picture/audio quality and stoppages during play back of USB content.

Media menu

Miracast (Screen mirroring)

Note: Many Android and Windows devices support screen mirroring. For Apple devices, you need a separate Apple TV box to allow screen mirroring onto non Apple products.
Note: If your smartphone or tablet does not include mirroring, it may be possible to connect a suitable cable from your device directly to one of the HDMI inputs on the rear of the TV. Suitable cables for your device should be available from a local electronics retailer.

Remote control

Key
1
2
3
4

Remote control

Key
1
2
3
4

Remote control

Key
1
2
3
4

Remote control

Key
1
2
3
4

Remote control

Key
1
2
3
4

Remote control

Key
1
2
3
4

Remote control

Key
1
2
3
4

Remote control

Key
1
2
3
4

Remote control

Key
1
2
3
4

Remote control

Key
1
2
3
4

Remote control

Key
1
2
3
4

Remote control

Key
1
2
3
4

Remote control

Key
1
2
3
4

Remote control

Key
1
2
3
4

Remote control

Key
1
2
3
4

Fjärrkontroll (Alternativ 2)

  1. (standby) – Slå på TV:n när den är i standby eller vice versa.
  2. SOURCE – Visar ingångs-/källmenyn.
  3. SIFFERKNAPPAR – 0–9 för att välja en TV-kanal direkt.
  4. (mute) – Stäng av ljudet eller vice versa.
  5. GUIDE – Öppnar 7 dags TV-guiden (digitalt läge).
  6. MENU – För att visa OSD-menyn.
  7. FAV – För att visa favoritmenyn.
  8. INFO – Tryck en gång för att visa information om programmet du tittar på just nu. Tryck igen för att visa detaljerad information. Tryck ► medan informationspanelen visas för att se information om det kommande programmet.
  9. (//// OK) – Gör att du kan navigera i menyerna på skärmen och justera systeminställningarna efter dina önskemål
  10. BACK – Gå tillbaka i menyn.
  11. APPS – Visar app-menyn.
  12. EXIT – Stänger alla menyer.
  13. VOL (+/-) – Vippa för att öka/minska ljudnivån.
  14. CH (+/-) – Vippa för att växla till nästa/föregående kanal i sekvensen.
  15. NETFLIX – Öppna Netflix-appen.
  16. Prime Video – Öppna Prime video-appen.
  17. YouTube – Öppna YouTube-appen.
  18. Freeview Play – Öppna Freeview Play-tjänsten. Endast tillgänglig i Storbritannien.
  19. AUDIO – Öppnar menyn för ljudspår.
  20. SUB – Slår på/stänger av undertexter längst ner på skärmen.
  21. TEXT – Slår på/stänger av text-TV.
  22. TV – Byt till digital TV-källa.
  23. – Spela upp/pausa media.
  24. – Spela i snabbspola bakåt läge.
  25. – Spela i snabbspola framåt läge.
  26. – Stoppa uppspelningen.
  27. FÄRGKNAPPAR – Utför motsvarande funktion vid den tiden.

TV-kontrollspak

TV-kontrollspaken finns på TV:ns baksida.

Du kan använda den i stället för fjärrkontrollen för att styra de flesta funktionerna i din TV.

När TV:n är i standby-läge:
  • kort truck på kontrollspaken - Ström på
Medan du tittar på TV:
  • HÖGER/VÄNSTER - volym upp/volym ner
  • UPP/NED – byter kanal upp/ned
  • kort tryck – visar menyn
  • långt tryck – Standby Ström på
Medan du är i menyn:
  • HÖGER/VÄNSTER/UPP/NED – navigering av markören i menyer på skärmen
  • kort tryck – OK/Bekrä fta markerat objekt
  • långt tryck – Tillbaka till föregående meny

Appar

Innehåller de vanligaste apparna för snabb och enkel åtkomst.

Netflix

Världens ledande Internet-tv-nätverk. Det erbjuder tusentals filmer och TV-program, inklusive originalserier, dokumentärer och spelfilm. Medlemmar kan spela, pausa och återuppta tittandet, allt utan reklam eller åtaganden. Du kan logga in på denna applikation med ditt befintliga Netflix-konto. Om du inte har Netflix-konto ännu kan du registrera via denna app eller via Netflix officiella webbplats.

YouTube

Videodelningsappen låter dig upptäcka och titta på originalvideoklipp.

Obs: För att YouTube-appen ska fungera krävs det att du har ställt in rätt datum och tid i TV:n. För mer information om hur du konfigurerar datum/tid i TV:n, hänvisas till menykapitel TID i denna bruksanvisning. Se till att nätverket inte blockerar åtkomsten till YouTube och att hastigheten på din internetanslutning är snabb nog för att visa YouTube-innehåll.

SMART portal

Öppnar Blaupunkt SMART portal.

Webbläsare

Applikation för tillgång till webbplatser via Internet. Navigering i webbläsaren:

Källor

Från denna meny kan du byta din TV:s ingångssignal till annan källa/ansluten enhet.

Att välja läge ingång/källa

Om du vill växla mellan de olika ingångarna/anslutningarna.

a) Med hjälp av knapparna på fjärrkontrollen:

Tryck på [SOURCE/] - Källmenyn visas.

Tryck på [◄] eller [►] för att välja den ingång du vill ha.

Tryck på [OK].

b) Att använda TV-kontrollspaken:

  1. Tryck kort på kontrollspaken för att öppna menyn.
  2. Tryck kontrollspaken nedåt och navigera markören till menyn KÄLLOR.
  3. Tryck kort på kontrollspaken för att öppna menyn KÄLLOR.
  4. med kontrollspaken, välj den ingång/källa du önskar.
  5. Genom att kort trycka på kontrollspaken ändrar du ingång/källa till den du valt.

Inställningar

Snabbinställningar

BILD

LJUD

KANAL

endast för enheter med inbyggd videofunktion

NÄTVERK

OBS: För att ansluta till Internet med en kabelanslutning, anslut en Cat 5/Ethernet-kabel (medföljer ej) från TV:n till ditt bredbandsmodem/router.

Wi-Fi - Detta anger anslutningsstatus för Wi Fi-nätverket. Om [OK] trycks ner, öppnas en annan meny som visar alla Wi-Fi-nätverk som TV:n kan plocka upp. Välj det som du vill ansluta till och tryck på [OK].
Om nätverket är låst, visas nu på skärmen en skärm för inmatning av lösenord med ett skärmtangentbord.

OBS: Anslutningsprocessen kan ta några minuter, ha tålamod. Varje gång TV:n sedan blir påslagen kommer den automatiskt att ansluta till nätverket, det kan också ta lite tid.

TID

SYSTEMET

LÅS

HDMI CEC måste stödjas av ansluten enhet.

VARNING: ALLA DATA PÅ USB-ENHETEN KOMMER ATT TAS BORT.
  • Hastighetskontroll -Hastighetstest av den anslutna USB-enheten.

endast för enheter med inbyggd videofunktion

Endast tillgängligt om butiksläge valdes under förstagångsinstallationen

Om TV

VARNING: Stäng inte av strömmen till TV:n förrän uppgraderingen är klar!

Anslutningar

USB
USB 2.0-ingång 1, 2, 3

HDMI 1, 2, 3 (ARC) in
HDMI2.0-ingång 1, 2, 3

SD-kortläsare
SD-kort ingång

R/L - Video & YPbPr ljud in
Komponent / Video ljudingång

Video (CVBS)
VIDEO-ingång

Component/YPbPr
komponent HD-ingång

CI Card IN
CI-ingång

RF In
RF / TV antenningång

Sat In
Satellitingång

Digital optisk ljudutgång
Digital optisk utgång

RJ 45
Ethernet

HÖRLURAR
3,5 mm hörlursuttag

SERVICE
serviceingång endast

TV-meny navigering

För att få tillgång till den här menyn tryck på knappen [MENU] på fjärrkontrollen. För att gå in i en meny tryck på [OK]. Om du vill göra ändringar i någon av standardinställningarna använder du bläddringsknapparna (▲/▼/◄/►). För att bekräfta några inställningar tryck på knappen [OK]. För att lämna denna meny när som helst, tryck på knappen [EXIT].

Appar

Innehåller de vanligaste apparna för snabb och enkel åtkomst.

Netflix

Världens ledande Internet-tv-nätverk. Det erbjuder tusentals filmer och TV-program, inklusive originalserier, dokumentärer och spelfilm. Medlemmar kan spela, pausa och återuppta tittandet, allt utan reklam eller åtaganden. Du kan logga in på denna applikation med ditt befintliga Netflix-konto. Om du inte har Netflix-konto ännu kan du registrera via denna app eller via Netflix officiella webbplats.

YouTube

Videodelningsappen låter dig upptäcka och titta på originalvideoklipp.

Obs: För att YouTube-appen ska fungera krävs det att du har ställt in rätt datum och tid i TV:n. För mer information om hur du konfigurerar datum/tid i TV:n, hänvisas till menykapitel TID i denna bruksanvisning. Se till att nätverket inte blockerar åtkomsten till YouTube och att hastigheten på din internetanslutning är snabb nog för att visa YouTube-innehåll.

AQUOS NET+

Öppnar Sharps SMART portal.

Webbläsare

Applikation för tillgång till webbplatser via Internet. Navigering i webbläsaren:

SMART Portal

SMART portal ger dig möjlighet att njuta av olika applikationer eller surfa på internet på din AQUOS LCD TV. För att komma åt SMART portal menyn när som helst, tryck på knappen SMART på fjärrkontrollen eller välj den från Fler appar.

OBS: Vänta medan TV:n ansluter till Wi-Fi-nätverket. Det kan ta ett par minuter efter att du slår på TV:n.

Navigera genom menyn med hjälp av bläddringsknapparna ▲/▼/◄/►. För att bekräfta det objekt du vill spela upp/visa tryck på [OK]. För “ett steg” tillbaka tryck på knappen [Meny] och för att få tillgång till ytterligare funktioner, använd de färgade knapparna.

För att lämna SMART portal tryck på knappen [EXIT].

ÅTERSTÄLLNING AV ANVÄNDARINSTÄLLNINGAR: Om du helt vill återställa alla användarinställningar på SMART portal, måste du först gå in i menyn Inställningar i portalen och välja “Återställ din enhet”. Välj JA med markören och tryck sedan på OK på fjärrkontrollen för att bekräfta återställning av inställningarna.
OBS: För att möta våra kunders krav, förbättrar vi våra produkter. Som ett resultat av våra ständiga ansträngningar kommer nya applikationer att kontinuerligt läggas till SMART portal. Applikationer och innehåll i SMART portal kan ändras utan föregående meddelande. Några av funktionerna och innehållet är kanske inte tillgängligt i ditt land.

Inställningar

Snabbinställningar

BILD

LJUD

KANAL

endast för enheter med inbyggd videofunktion

NÄTVERK

OBS: För att ansluta till Internet med en kabelanslutning, anslut en Cat 5/Ethernet-kabel (medföljer ej) från TV:n till ditt bredbandsmodem/router.

Wi-Fi - Detta anger anslutningsstatus för Wi Fi-nätverket. Om [OK] trycks ner, öppnas en annan meny som visar alla Wi-Fi-nätverk som TV:n kan plocka upp. Välj det som du vill ansluta till och tryck på [OK].
Om nätverket är låst, visas nu på skärmen en skärm för inmatning av lösenord med ett skärmtangentbord.

OBS: Anslutningsprocessen kan ta några minuter, ha tålamod. Varje gång TV:n sedan blir påslagen kommer den automatiskt att ansluta till nätverket, det kan också ta lite tid.

TID

SYSTEMET

LÅS

HDMI CEC måste stödjas av ansluten enhet.

VARNING: ALLA DATA PÅ USB-ENHETEN KOMMER ATT TAS BORT.
  • Hastighetskontroll -Hastighetstest av den anslutna USB-enheten.

endast för enheter med inbyggd videofunktion

Endast tillgängligt om butiksläge valdes under förstagångsinstallationen

Om TV

VARNING: Stäng inte av strömmen till TV:n förrän uppgraderingen är klar!

Media

USB

Multimedialäge erbjuder uppspelning av olika innehåll som sparats på ett USB-minne. Innehållet kommer att delas in i olika filtyper: Foto, musik och film. “Filalternativ” kommer att visas och gör att du kan spela upp alla typer av innehåll som stöds.

  1. Du kan navigera genom menyn med hjälp av bläddringsknapparna ▲/▼/◄/►. För att bekräfta det objekt du vill spela upp/visa tryck på [OK].
  2. Medan du tittar på innehåll kan du styra uppspelningslägena med hjälp av fjärrkontrollens knappar eller genom att ta fram uppspelningsnavigeringsmenyn och välja knapparna på skärmen ▲/▼/◄/► och [OK]
OBS!: USB-förlängningskablar rekommenderas inte eftersom de kan orsaka en reducering av bild/ljudkvaliteten och driftstopp under uppspelning av USB-innehåll.

Miracast*

Gör att du kan visa innehåll från din smartphone eller pekdator på TV-skärmen. Trådlös anslutning bildas med hjälp av Wi-Fi Direct, så tillgång till ett Wi-Fi-nätverk behövs inte. Du kan dela innehåll från din smartphone eller pekdator baserad på Android 4.4 och nyare system.

Mediaserver

Söker automatiskt efter digitala mediaservrar (DMS) som är anslutna till ditt hemnätverk och möjliggör uppspelning och återgivning av innehåll från mediaservrar.

Denna funktion är endast tillgänglig på utvalda smartphones och bärbara datorer.

Kanallista

Tryck på knappen [OK] för att aktivera kanallistan, när du tittar på TV. Detta låter dig snabbt välja en kanal att titta på – välj önskad kanal med hjälp av upp- och nedpilarna eller CH +/- på fjärrkontrollen. Tryck på [OK] för att titta.

I den här menyn kan följande två alternativ väljas:

Obs: För att flytta kanaler, säkerställ att i kanalmenyn är ”LCN” och ”Auto-uppdatering kanallista” avstängda

AQUOS NET+

AQUOS NET+ ger dig möjlighet att njuta av olika applikationer eller surfa på internet på din AQUOS LCD TV. För att komma åt AQUOS NET+ menyn när som helst, tryck på knappen NET+ på fjärrkontrollen eller välj den från Fler appar.

OBS: Vänta medan TV:n ansluter till Wi-Fi-nätverket. Det kan ta ett par minuter efter att du slår på TV:n.

Navigera genom menyn med hjälp av bläddringsknapparna ▲/▼/◄/►. För att bekräfta det objekt du vill spela upp/visa tryck på [OK]. För “ett steg” tillbaka tryck på knappen [Meny] och för att få tillgång till ytterligare funktioner, använd de färgade knapparna.

För att lämna AQUOS NET+ tryck på knappen [EXIT].

ÅTERSTÄLLNING AV ANVÄNDARINSTÄLLNINGAR: Om du helt vill återställa alla användarinställningar på AQUOS NET+, måste du först gå in i menyn Inställningar i portalen och välja “Återställ din enhet”. Välj JA med markören och tryck sedan på OK på fjärrkontrollen för att bekräfta återställning av inställningarna.
OBS: För att möta våra kunders krav, förbättrar vi våra produkter. Som ett resultat av våra ständiga ansträngningar kommer nya applikationer att kontinuerligt läggas till AQUOS NET+. Applikationer och innehåll i AQUOS NET+ kan ändras utan föregående meddelande. Några av funktionerna och innehållet är kanske inte tillgängligt i ditt land.

7 dagars TV-guide

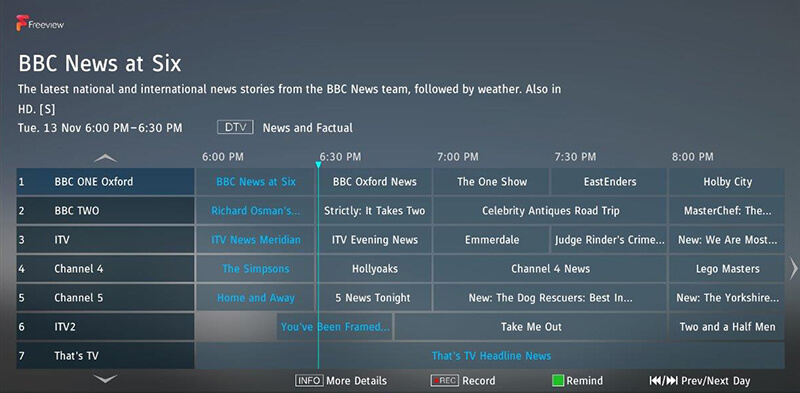
TV-guide är tillgängligt i Digital-TV-läge. Den ger information om kommande program (där det stöds av den digitala kanalen). Du kan se start- och sluttiden för alla program och på alla kanaler under de närmaste 7 dagarna och ställa in påminnelser.

  1. Tryck på [TV GUIDE]. Följande 7 dagars TV-guide visas.
  2. Navigera genom menyn med ▲/▼/◄/►.
    Du kan nu:
    Tryck på [INFO] för att visa ytterligare information om programmet som markerats.
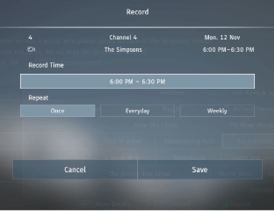
    Tryck på knappen [REC] på ett markerat program för att använda inspelningsfunktionen.*
    • Spela in ett program en gång - tryck på knappen [REC] en gång.
    • Ställ in en daglig inspelning - tryck på knappen [REC] två gånger, en inspelning sker varje dag vid denna tid.
    • Ställ in en veckovis inspelning - tryck tre gånger på knappen [REC], inspelningen kommer att hända varje vecka, denna dag och vid denna tidpunkt.
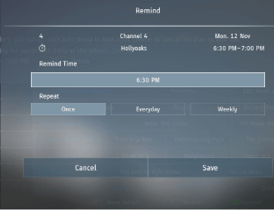
    Tryck på knappen [GRÖN] på ett markerat program för att ställa in en påminnelse.
    Tryck på / för att visa föregående/nästa dags lista över program.
  3. Tryck på [EXIT] för att avsluta 7-dagars TV-guiden.

endast för modeller med inspelningsfunktion

USB-inspelning - Digitalt läge*

Inbyggt i denna TV är en USB-inspelningsfunktion. Denna funktion är tillgänglig i Digitalt läge när den används tillsammans med ett kompatibelt USB-minne eller en USB-hårddisk. Fördelarna med detta är följande:

  • Pausa direktsänd TV och sedan spela upp, snabbspola framåt och bakåt (fram till direktsänd TV).
  • Enknappsinspelning, om du bestämmer dig för att spela in det aktuella programmet.
  • Enkel programmerbar inspelning från 7-dagars TV-guiden

På grund av produktens egenskaper, är det nödvändigt att använda ett höghastighets-USB-minne (eftersom TV:n läser från och skriver till minnet samtidigt, en del minnen kanske inte passar).

Minimispecifikation - USB-minne

Pausa direktsänd TV (Tidsförskjutning)*

Arr pausa direktsänd TV är mycket enkelt.

  • Tryck på knappen spela upp/pausa och tv:n kommer att pausa och det direktsända innehållet kommer att spelas in. För att återgå till att titta tryck på spela upp/pausa igen.
  • Tryck på snabbspola framåt för att gå framåt i en inspelning (t.ex. för att hoppa över reklam).
  • Tryck på snabbspola bakåt för att gå tillbaka i en inspelning (t.ex. om du snabbspolade för långt).
TIPS: När du försätter TV:n i standbyläge eller byter kanal kommer tidsförskjutningsminnet att raderas. För att starta om tidsförskjutning måste du trycka på knappen spela upp/pausa.

Enknappsinspelning

När som helst kan du välja att spela in den aktuella kanalen som du tittar på. För att göra detta måste du trycka på knappen [REC].

TIPS: Denna TV innehåller en TV-tuner, därför kan den bara spela in den kanal du tittar på eller spela in en kanal medan TV:n är i standby-läge.
OBS!: USB-inspelningsfunktion är endast tillgänglig i Digital-TV-läge. På grund av upphovsrättslagar och illegal kopiering/inspelning är det inte möjligt att spela in till/från någon annan ingångs/utgångskälla.

endast för enheter med inbyggd videofunktion

TV Menu Operation

SETTINGS MENU

Quick settings menu

Playback files from Record list
  • Press [RED] to delete a selected recording.
  • Press [GREEN] to sort the items in the record list by date.
  • Press [YELLOW] to sort the items in the record list by name.
  • Press [BLUE] to enter the schedule list.
Note: Recording is only possible when a USB stick is plugged in and formatted at FAT32. VIsit the ‘USB RECORDING’ page for more information.

Picture Menu

For complete control of your picture settings, enter the ‘Picture’ menu to set up the following adjustments. These will allow you to enhance your viewing experience and utilise the full capability of the television.
  • Auto
  • 16:9
  • 4:3
  • Zoom 1
  • Zoom 2
Expert Settings
Use these adjustment settings to improve the picture in more detail.
Noise Reduction Off, Low, Medium, High.
Gamma Changes the range of the colour reproduction. Low, Medium and High.
Active Contrast Allows for the contrast level to be adjusted automatically depending on picture content. ‘ON’ or ‘OFF’.
Backlight Switches optimization of the backlight and contrast of the picture. Range: 1-100
Red Adjust the amount of red in the picture. Range: 1-100
Green Adjust the amount of green in the picture. Range: 1-100
Blue Adjust the amount of blue in the picture. Range: 1-100
CMS Hue This is a standard to adjust the colour either more reddish or more bluish in tone. R/G/B/C/M Range: -63 to 63
CMS Value A higher value makes the image brighter. A lower value makes the image darker. R/G/B/C/M Range: -32 to 31
CMS Saturation Increases or decreases the saturation of a selected colour. R/G/B/C/M Range: 0 to 15

SOUND MENU

For complete control of your audio settings, enter the ‘Sound’ menu to set up the following adjustments. These will allow you to enhance your listening experience and expand the full capability of the television.

Channel menu

  • Terrestrial Digital Television
  • Cable Digital Television
  • Satellite Digital Television
  • Analogue Television
Important: To receive Freeview/Saorview channels, in particular HD channels, you will need a Digital TV aerial and be in a good Freeview/Saorview coverage area. You can check the coverage for your area at www.freeview.co.uk or www.saorview.ie
Note: Any Freeview HD channels found during tuning will be placed in channel positions above 100. For example, 101 (BBC1 HD) 102 (BBC2 HD) etc.
Note: Freeview channels are only available in the UK, Saorview channels are only available in the ROI.
Signal Information
Note: If channels are tuned in on satellite, other tuning modes are not possible.

NETWORK menu

Set up and control your network and internet access here. There are two ways to connect to your local network, in most cases this will be the router used to connect to the internet.
IPv4
IPv6

Time Menu

Any time related function can be set or seen here.

System Menu

Set up system control options in this menu.
Language
Note: Only languages which are being transmitted can be selected.
Lock
HDMI CEC
Advanced Settings

About TV

ABOUT TV

Select other input data source from this menu:
Note: If you experience a playback issue, please ensure the files being used are the correct format (example - the picture plays but no sound) See the ‘Compatible file types for USB playback’ section at the rear of these Operating Instructions.
Note: If your smartphone or tablet does not include mirroring, it may be possible to connect a suitable cable from your device directly to one of the HDMI inputs on the rear of the TV. Suitable cables for your device should be available from a local electronics retailer.
Note: USB extension cables are not recommended as they can cause a reduction in picture/audio quality and stoppages during play back of USB content.

Media menu

Miracast (Screen mirroring)

Note: Many Android and Windows devices support screen mirroring. For Apple devices, you need a separate Apple TV box to allow screen mirroring onto non Apple products.
Note: If your smartphone or tablet does not include mirroring, it may be possible to connect a suitable cable from your device directly to one of the HDMI inputs on the rear of the TV. Suitable cables for your device should be available from a local electronics retailer.

HDR (High Dynamic Range)

HDR-video tar bort några av begränsningarna för en vanlig videosignal och visar bilden byggd från ett större spektrum av färg och ljusstyrka.

Obs:
  • HDR-funktionen aktiveras automatiskt om en HDR-signal detekteras, förutsatt att HDMI 2.0-format är inställd på “Förbättring” i menyn “HDMI-Inställningar”.
  • Om du ansluter via en av HDMI-portarna måste den externa enheten också stödja HDR, HDMI2.0 och spela HDR-hanterat innehåll.

Remote control

Key
1
2
3
4

Operating Instructions Advice

Note: It is not recommended to connect external user interface devices, such as a keyboard or mouse, to this set.

TV Menu Operation

SETTINGS MENU

Quick settings menu

Playback files from Record list
  • Press [RED] to delete a selected recording.
  • Press [GREEN] to sort the items in the record list by date.
  • Press [YELLOW] to sort the items in the record list by name.
  • Press [BLUE] to enter the schedule list.
Note: Recording is only possible when a USB stick is plugged in and formatted at FAT32. VIsit the ‘USB RECORDING’ page for more information.

Picture Menu

For complete control of your picture settings, enter the ‘Picture’ menu to set up the following adjustments. These will allow you to enhance your viewing experience and utilise the full capability of the television.
  • Auto
  • 16:9
  • 4:3
  • Zoom 1
  • Zoom 2
Expert Settings
Use these adjustment settings to improve the picture in more detail.
Noise Reduction Off, Low, Medium, High.
Gamma Changes the range of the colour reproduction. Low, Medium and High.
Active Contrast Allows for the contrast level to be adjusted automatically depending on picture content. ‘ON’ or ‘OFF’.
Backlight Switches optimization of the backlight and contrast of the picture. Range: 1-100
Red Adjust the amount of red in the picture. Range: 1-100
Green Adjust the amount of green in the picture. Range: 1-100
Blue Adjust the amount of blue in the picture. Range: 1-100
CMS Hue This is a standard to adjust the colour either more reddish or more bluish in tone. R/G/B/C/M Range: -63 to 63
CMS Value A higher value makes the image brighter. A lower value makes the image darker. R/G/B/C/M Range: -32 to 31
CMS Saturation Increases or decreases the saturation of a selected colour. R/G/B/C/M Range: 0 to 15

SOUND MENU

For complete control of your audio settings, enter the ‘Sound’ menu to set up the following adjustments. These will allow you to enhance your listening experience and expand the full capability of the television.

Channel menu

  • Terrestrial Digital Television
  • Cable Digital Television
  • Satellite Digital Television
  • Analogue Television
Important: To receive Freeview/Saorview channels, in particular HD channels, you will need a Digital TV aerial and be in a good Freeview/Saorview coverage area. You can check the coverage for your area at www.freeview.co.uk or www.saorview.ie
Note: Any Freeview HD channels found during tuning will be placed in channel positions above 100. For example, 101 (BBC1 HD) 102 (BBC2 HD) etc.
Note: Freeview channels are only available in the UK, Saorview channels are only available in the ROI.
Signal Information
Note: If channels are tuned in on satellite, other tuning modes are not possible.

NETWORK menu

Set up and control your network and internet access here. There are two ways to connect to your local network, in most cases this will be the router used to connect to the internet.
IPv4
IPv6

Time Menu

Any time related function can be set or seen here.

System Menu

Set up system control options in this menu.
Language
Note: Only languages which are being transmitted can be selected.
Lock
HDMI CEC
Advanced Settings

About TV

ABOUT TV

Select other input data source from this menu:
Note: If you experience a playback issue, please ensure the files being used are the correct format (example - the picture plays but no sound) See the ‘Compatible file types for USB playback’ section at the rear of these Operating Instructions.
Note: If your smartphone or tablet does not include mirroring, it may be possible to connect a suitable cable from your device directly to one of the HDMI inputs on the rear of the TV. Suitable cables for your device should be available from a local electronics retailer.
Note: USB extension cables are not recommended as they can cause a reduction in picture/audio quality and stoppages during play back of USB content.

Media menu

Miracast (Screen mirroring)

Note: Many Android and Windows devices support screen mirroring. For Apple devices, you need a separate Apple TV box to allow screen mirroring onto non Apple products.
Note: If your smartphone or tablet does not include mirroring, it may be possible to connect a suitable cable from your device directly to one of the HDMI inputs on the rear of the TV. Suitable cables for your device should be available from a local electronics retailer.

Remote control

Key
1
2
3
4

First Time Installation


Note These screens only come up if more than one region is found. i.e. two or more transmitters are tuned in.
Note: In Home Mode, the TV will switch itself to the standby mode after 4 hours in the event that the buttons on the remote control or TV set are not used. This can be disabled in the ‘TIME’ menu.

Remote control

Key
1
2
3
4

Remote control

Key
1
2
3
4

Wall Mounting and Set Security

Securing the TV to a wall

Note: Please ensure that children do not climb on or near the TV set.
Note: When handling the set do not grip the LCD Panel.
Note: Do not pull the set when mounted on a bracket. If using a moveable bracket, adjust via the bracket and not the set.

Wall mounting

Important: If wall mounting this TV, only use the screws already provided in the wall mounting holes.
Important: If wall mounting this TV, only use the screws already provided in the wall mounting holes. Using other screws which are longer could cause irreparable damage to internal parts. When using a wall bracket, please ensure the screws in the back of the TV set are not over tightened.
Note: the wall bracket type shown in the diagram is for illustration purposes only, other brackets may be used and it is recommended that the spacers and screws are tested to see if they fit correctly before final assembly.
Important: Only use the screws provided to mount the set onto a wall bracket. When using a wall bracket, please ensure the screws in the back of the TV set are not over tightened. Failure to use the correct screws may lead to damage.
Note: Spacers and screws are not supplied for all models, refer to the Quick Start Guide for more information.
Note: Due to the use of rear facing HDMI connectors, right angled HDMI adapters can be utilized to reduce the space required behind the set to allow the cable to bend safely. There are different types of HDMI angled connectors, ensure that the one being used is suitable for the cable/socket types.

TV control stick and input source

TV Control Stick

  • Press the centre of the control stick once - Power on the TV set
  • RIGHT/LEFT – volume up/volume down
  • UP/DOWN – changes channel up/dow
  • Press the centre of the control stick once – displays the menu
    • Press and hold the centre of the control stick – Standby/Power Off
  • RIGHT/LEFT/UP/DOWN – navigation of cursor in on-screen menus
  • Press the centre of the control stick once – OK/Confirm selected item
  • Press and hold the centre of the control stick – back to previous menu

Choosing Mode Input/Source

  1. Press [SOURCE] - The ‘source’ menu will appear
  2. Press [<] or [>] to select the input you require.
  3. Press [OK].
  1. Press the centre of the control stick once to enter the TV menu.
  2. Press the control stick RIGHT/LEFT and navigate through to ‘SOURCE’ menu.
  3. Press the centre of the control stick to enter the ‘SOURCE’ menu.
  4. Press the control stick RIGHT/LEFT to scroll through and select the input/source you require.
  5. Press the centre of the control stick to select the chosen input/source option highlighted.

Source menu

Note: Inputs may vary depending on your television specification.
Note: If the inputs have been renamed, they will not appear as shown above.

7 day TV guide and channel list

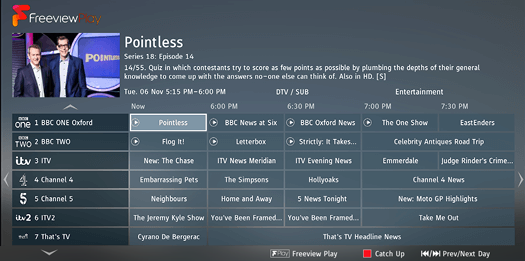
Freeview Play

To be recorded on Catch Up.
Already recorded on Catch Up.
Catch Up is only applicable to sets with Freeview Play.
Note: Freeview HD channels found during tuning will be placed in channel positions above 100, for example, 101 - BBC 1 HD, 102 - BBC 2 HD etc.
Non-Freeview Play 7 Day Guide
Note: Record functions are only applicable to sets with a built in USB Record/PVR function.
Note: When the TV set is on, a reminder message will be displayed informing you that a programme is about to start. If the set is in standby, then it will turn on at the reminder time.

Note: When recording in standby mode, the set will not turn on. While recording in standby, the light on the front of the set will flash.

Freeview play APP

Only applicable to sets with Freeview Play.
Note: To use the full functionality of Freeview Play your set must be connected to the internet.
Note: Some apps require additional registration, this is a simple process and it will inform you of the correct website to visit to complete the registration.

Catch Up tv

Note: Areas receiving Saorview transmissions will not support catch up services.
  • Access the Freeview play app by pressing the [FREEVIEW PLAY] button.
  • Access the 7 day TV guide by pressing the [RED] button.

CHANNEL LIST

Note: If channels are moved or deleted, any settings made to record on that channel will not work.

Applications menu

Applications Guide

Note:The position of apps may vary depending on your TV set.
Note:The applications available will be different depending if the set is a Freeview Play model. Refer to the application list.
Note: HDR is supported on apps such as Netflix and YouTube, and only works if the data being streamed contains HDR data.

Applications menu

Note: Some Apps, such as Netflix, require a monthly subscription. This is not included with the purchase of your TV set.
Note: The appearance and functionality of apps may vary depending upon the revision of the app and the platform it is designed to be used on. On-demand players may also change depending upon the region in which the set is tuned into.

Applications menu

Applications Guide

Note:The position of apps may vary depending on your TV set.
Note:The applications available will be different depending if the set is a Freeview Play model. Refer to the application list.
Note: HDR is supported on apps such as Netflix and YouTube, and only works if the data being streamed contains HDR data.

Applications menu

Note: Some Apps, such as Netflix, require a monthly subscription. This is not included with the purchase of your TV set.
Note: The appearance and functionality of apps may vary depending upon the revision of the app and the platform it is designed to be used on. On-demand players may also change depending upon the region in which the set is tuned into.

USB recording

Freeview and Saorview only
  • Pause live TV and then playback, rewind and fast forward (up to live TV).
  • One button record, if you decide you want to record the current programme.
  • Easy recording from the 7 Day TV Guide.
Recommended Minimum Specification - USB Memory Stick
Note: When you switch the TV to standby or change channel the ‘Time Shift’ memory is wiped. To restart time shift you must press [PLAY/PAUSE] button.
Note: If channels are moved or deleted, then the USB Record/PVR will not function correctly.
Note: This television contains one TV tuner, therefore it can only record the channel you are watching or record one channel while the television is in standby mode.
Note: USB Record/PVR record function is only available in Digital/Freeview TV mode. Due to copyright laws and illegal copying/recording it is not possible to record to/from any other input/output source.
Note: Recorded content can only be played back on the device that recorded it. It is not permitted (or possible) to watch content recorded on the TV from Freeview/Saorview on another device.
One Button Record
Note: Record functions are only applicable to sets with the built in USB Record/PVR function.

USB & DNLA Media Types

Media

Codec

Resolution

Bit Rate

File Extension

Film

MPEG1/2

1080P@60fps

80Mbps

".DAT, .VOB, .MPG, .MPEG,.ts, .trp,
.tp, .mp4, .mov, .3gpp, .3gp, .avi,
.mkv, .asf"

MPEG4

1080P@60fps

40Mbps

".MPG, .MPEG, .mp4, .mov,
.3gpp, .3gp, .avi"

XviD

1080P@60fps

40Mbps

.divx, .mp4, .mov, .avi, .mkv, .asf

H.263

1080P@60fps

40Mbps

".mp4, .mov, .3gpp, .3gp, .av,
.mkv"

H.264

"4096x2160@30fps
1080P@60fps"

135Mbps

".flv, .mp4, .mov, .3gpp, .3gp, .ts,
.trp, .tp, .asf, .wmv, .avi, .mkv"

Motion JPEG

1080P@30fps

10Mbps

".avi, .3gpp, .3gp, .mp4, .mov,
.mkv, .asf"

VP8

1080P@60fps

20Mbps

.mkv, .webm

HEVC

4K2K@60fps

100Mbps

.mp4, .mov, .mkv, .ts, .trp, .tp

VP9

4K2K@60fps

100Mbps

.mkv, .webm

Media

Codec

Frequency

Bit Rate

File Extension

Music

MPEG1/2 Layer1, 2, 3

16KHz ~ 48KHz

32Kbps ~ 320Kbps

".mp3, .avi, .as, .mkv, .ts, .trp, .tp,
.DAT, .VOB, .MPG, .MPEG, .wav"

AC3

"32KHz, 44.1KHz,
48KHz"

32Kbps ~ 640Kbps

".ac3, .avi, .mkv, .divx, .3gpp,
.3gp, .mp4, .mov, m4a, .ts, .trp,
.tp, .DAT, .VOB, .MPG, .MPEG,
.rm, .rmvb"

EAC3

"32KHz, 44.1KHz,
48KHz"

32Kbps ~ 6Mbps

".ec3, .3gpp, .3gp, .mp4, .mov,
m4a, .ts, .trp, .tp, .DAT, .VOB,
.MPG, .MPEG"

AAC, HEAAC

8KHz ~ 48KHz

128bps ~ 320Kbps

".aac, .avi, .mkv, .divx, .3gpp,
.3gp, .mp4, .mov, m4a, .ts, .trp,
.tp, .DAT, .VOB, .MPG, .MPEG, . v,
.rm, .rmvb"

VORBIS

Up to 48KHz

".mkv, .webm, .3gpp, .3gp, .mp4,
.mov, m4a, .ogg"

DTS

Up to 48KHz

< 1.5Mbps

".ts, .trp, .tp, .DAT, .VOB, .MPG ,
.MPEG, .mkv"

FLAC

8KHz~96 KHz

< 1.6Mbps

.mkv, . ac

Media

Resolution

File Extension

Photo

JPEG

15360x8640, (1920x8 x 1080x8)

Base-line

.jpg/.jpeg

1024x768

Progressive

PNG

9600x6400

Non-interlace

.png

1200x800

Interlace

BMP

9600x6400

.bmp

MPO

15360x8640, (1920x8 x 1080x8)

Base-line

.mpo

1024x768

Progressive

GIF

6400x4800

.gif

Quick Lookup: Specifications - USB & DNLA Media Types

Internal Subtitle

File Extension

Container

Subtitle Codec

.mp4

MP4

DVD Subtitle, UTF-8 Plain Text

.mkv

MKV

"ASS, SSA, UTF-8 Plain
Text, VobSub, DVD Subtitle"

.avi

AVI(1.0, 2.0)

XSUB, XSUB+

External Subtitle

File Extension

Subtitle Parser

Remark

.srt

SubRip

.ssa/ .ass

SubStation Alpha

.smi

SAMI

.sub

SubViewer, Micro DVD, DVD Subtitle System, Subldx (VobSub)

SubViewer 1.0 & 2.0 Only

.txt

TMPlayer

Connections

Note: The TV input/output connections and connecting cables on these pages are shown for reference. Cables are available separately from your retailer. Not all connections are available on all TV models.
Connecting to a device with Composite AV/Video output
Connecting to an external audio device (Amplifier, Surround Sound, Sound Bars etc)
Note: When connecting an external audio device to the TV, set the TV volume to a higher than normal level, you will then be able to use your device remote control to adjust the volume of the connected device to suit your requirements.
Connecting to a device with HDMI output
Connecting to a device with RF output (CCTV or other Analogue devices)
Note: You will need to manually tune your device into an analogue channel.
Connecting an Ethernet/Network cable
Connecting to a USB device
Note: Tablets and/or phones can be charged via the USB port, however, it’s not possible to play back media from these devices.
Note: Some USB devices may need to be connected to an external power supply before being used with this input, i.e. powered hard drive.
Connecting the TV to Earphones

Troubleshooting guide

UPDATING SOFTWARE

Note: If your set is outside of guarantee and the installation of the software causes a different issue you may be liable for a chargeable repair service. The reason for this is because you may have an inherent fault which can cause corruption on one of the boards when installing the software. This could result in your unit locking into SAFE mode whereby it is stuck in standby. This is not a fault with the software, this would be caused by an existing faulty board that would have required a repair.
Note: For further support with software updates, contact our technical support team or refer to the ‘Product Support’ section of the website. If the TV is using the newest software available it will not attempt to update the software.

Getting started - initial set up

Getting started - initial set up

  1. Using the RF cable, connect the TV to the TV Aerial wall socket.
  2. For connecting to the Internet with a wired connection connect a Cat 5/Ethernet cable (not included) from the TV to your broadband modem/router.
  3. Connect the power cable to the rear of the TV, and then connect it to the electrical outlet.
  4. Insert the batteries supplied into the Remote control.
  5. Then press Standby button to power on TV.
  6. You will be now welcomed with the First Time Installation screen.
    If it does not appear, on the remote control, please press [MENU] then 8-8-8-8 and the menu will appear.
    If you wish to make changes to any of the default settings, use the scroll ▲/▼/◄/► buttons. To exit this menu at anytime, press [EXIT] button.
  7. Please set desired settings in First Time Installation screen.
    STEP 1 - Set the TV Menu language.
    STEP 2 - set your country
    STEP 3 - Set type of network connection. If you wish to skip this step and connect TV to network later, please choose Skip Network Setting
    STEP 4 - Select the location of TV. For home use, please select Home. For shop demonstration mode, set Store.
    STEP 5 - choose if your TV has stand, or if it is mounted on the wall. TV will set optimal audio settings for selected option.
    STEP 6 - choose input source which you want to use. If you have connected RF cable directly to TV, choose DTV. If you have satellite directly connected to your TV, choose DVB-S*. In case you are using set-top-box, please pick correct input to which it is connected.
  8. If you selected in last step DTV or DVB-S2, you will be asked if you want to tune channels. If you choose “No”, you can tune channels later from SETTINGS/CHANNEL menu. If you choose “Yes”, tuning menu will appear.
    Digital TV (DTV) tuning: In DVB Antenna, please choose which type of signal you have. Terrestrial (DVB-T) or Cable (DVB-C). Then enter Auto tuning and set your desired settings. Again choose Auto tuning to start tuning of channels.
    Satellite (DVB-S2) tuning: Enter Auto Tuning and enter Satellite. Here you can choose between the various satellites. Select satellite which you wish to tune by pressing OK button on remote control. Then return to previous menu by pressing BACK button on your remote control and choose Auto tuning to start tuning of channels.
    NOTE: To shorten tuning time of satellite channels, some countries have preinstalled channel list for most popular satellite in that region. If this is the case for your selected country, you will be asked if you wish to load preinstalled channel list. If you choose “Yes”, satellite channel list will be imported to your TV within few seconds.
    TIP: If you are missing channels, the reason for this is likely to be signal strength, you should consider connecting signal booster and re-tuning the TV.

    Remote control

  9. STANDBY – Switch on TV when in standby or vice versa.
  10. MUTE – Mute the sound or vice versa.
  11. 0 – 9 – to select a TV channel directly.
  12. TV GUIDE – Opens the 7 Day TV Guide (Digital mode).
  13. To return to the previous channel viewed.
  14. PICTURE Scrolls through picture mode options.
  15. VOL ▲/▼ To increase / decrease the sound level.
  16. CH ▲/▼ To increase or decrease the channel being watched.
  17. SOUND Scrolls through sound mode options.
  18. SOURCE – To display the input/source menu.
  19. MENU – To display OSD menu.
  20. EXIT – To exit all menus.
  21. (▲/▼/◄/►/ OK) – Allows you to navigate the on-screen menus and adjust the system settings to your preference.
  22. BACK – Back to previous menu.
  23. FAV – To display favourites menu.
  24. INFO – Press once for now/next channel information. Press twice for programme information about current programme.
  25. TEXT – Teletext mode - To enter Teletext
  26. SUBTITLE – To switch the dialogue at the bottom of the screen (on/off).
  27. TV – Switch to digital TV source.
  28. YouTube – Displays YouTube application
  29. NETFLIX – Displays NETFLIX application
  30. NET+ – Displays AQUOS NET+ menu.
  31. Rec1 PVR Record
  32. To restart the current chapter
  33. To advance forward to the next chapter
  34. To stop the playback
  35. Rec List1 Opens the list of recordings.
  36. To play in fast rewind mode.
  37. To play in fast forward mode.
  38. To play/pause
  39. COLOUR BUTTONS Additional teletext and OSD functions

1 - available only with PVR function

TV Controls

TV buttons*

Vol+ Volume up and menu right

Vol- Volume down and menu left

CH+ Programme/Channel up and menu up

CH- Programme/Channel down and menu down

MENU Displays Menu/OSD

SOURCE Displays the input source menu

STANDBY Standby Power On/Off

for TV with buttons

TV Control Stick*

TV control stick is located on the lower left corner of back side of the TV. You can use it instead of remote control to control most of the functions of your TV.

While TV is in standby mode:

  • short press of control stick - Power On

While watching TV:

  • RIGHT/LEFT – volume up/volume down
  • UP/DOWN – changes channel up/down
  • short press – Displays Menu
  • long press – Standby Power Off

While in menu:

  • RIGHT/LEFT/UP/DOWN – navigation of cursor in on-screen menus
  • short press – OK/Confirm selected item
  • long press – Back to previous menu
  • for TV with control stick

Choosing Mode Input/Source

To switch between the different input/connections.

a) Using the buttons on the remote control:

  1. Press [SOURCE/] - The source menu will appear.
  2. Press [] or [] to select the input you require.
  3. Press [OK].

b1) Using the buttons* on the Television:

  1. Press [SOURCE].
  2. Scroll up/down using VOL+ /VOL- buttons to the input/source you require.
  3. Press [SOURCE] to change input/source to the one selected.

b2) Using the TV control stick*:

  1. Shortly press control stick to enter menu.
  2. Press control stick down and navigate cursor to SOURCES menu.
  3. Shortly press control stick to enter SOURCES menu.
  4. with control stick choose the input/source yourequire.
  5. By short press of control stick, you will change input/source to the one selected.

optional

TV Menu navigation

To access this menu, press [MENU] button on the remote control. To enter a menu press [OK]. If you wish to make changes to any of the default settings, use the scroll (▲/▼/◄/►) buttons. To confirm any settings press [OK] button. To exit this menu at anytime, press [EXIT] button.

Applications

Netflix

World’s leading Internet television network. It is offering thousands of movies and TV shows, including original series, documentaries and feature films. Members can play, pause and resume watching, all without commercials or commitments. You can log in to this application with your existing Netflix account. If you do not have Netflix account yet, you can register via this app or via official Netflix website.

YouTube

Videosharing app allows you to discover and watch originally-created videos.

Note: For Youtube app to work, it is required to have set up correct date and time in TV. For more information about setting up date/time in TV, please refer to the TIME menu chapter of this user guide. Please ensure that your network is not blocking access to YouTube and the speed of your internet connection is fast enough for viewing YouTube content.

More Apps

Contains the most commonly used apps for quick and easy access.

Sources

From this menu, you can switch your TV input signal to different source/connected device.

Media

The ‘File Option’ will show and allow you to play all types of supported content.

  1. You can navigate through the menu using the scroll ▲/▼/◄/► buttons. To confirm the item you wish to play/view press [OK] button.
  2. While viewing content you can control the playback modes using the remote control buttons or by bringing up the playback navigation menu and selecting on-screen buttons ▲/▼/◄/► and [OK]
Note: USB extension cables are not recommended as they can cause a reduction in picture/audio quality and stoppages during play back of USB content.

This function is only available on selected smartphones and notebooks.

Picture

Sound

Settings

CHANNEL

Only for devices with built in PVR function

NETWORK

NOTE: For connecting to the Internet with a wired connection, connect a Cat 5/Ethernet cable (not included) from the TV to your broadband modem/router.
NOTE: The connection process may take a few minutes, please be patient. Every time the TV is then powered on it will automatically connect to the network, this may also take some time.

TIME

LOCK

SETUP

only for devices with built in PVR function

NOTE: The TV will automatically search for new releases of software every time it is turned on. If new software is found, it will ask you if you would like to download and install it. If you select “Yes” the TV will upgrade to the latest software.
WARNING: Do not turn off the TV’s power until the upgrade is complete!

HDMI CEC must be supported by connected device.

AQUOS NET+

CHANNEL

Only for devices with built in PVR function

NETWORK

NOTE: For connecting to the Internet with a wired connection, connect a Cat 5/Ethernet cable (not included) from the TV to your broadband modem/router.
NOTE: The connection process may take a few minutes, please be patient. Every time the TV is then powered on it will automatically connect to the network, this may also take some time.

TIME

LOCK

SETUP

only for devices with built in PVR function

NOTE: The TV will automatically search for new releases of software every time it is turned on. If new software is found, it will ask you if you would like to download and install it. If you select “Yes” the TV will upgrade to the latest software.
WARNING: Do not turn off the TV’s power until the upgrade is complete!

HDMI CEC must be supported by connected device.

7 Day TV Guide

TV Guide is available in Digital TV mode. It provides information about forthcoming programmes (where supported by the Digital channel). You can view the start and end time of all programmes and on all channels for the next 7 days and set reminders.

  1. Press [TV GUIDE]. The following 7 Day TV Guide will appear.
  2. Navigate through the menu using ▲/▼/◄/►.
    You can now:
    Record selected TV channel and TV show by pressing the RED button.*
    Set a reminder by pressing GREEN.
    View a previous day by pressing YELLOW.
    View the next day by pressing BLUE. [INFO] shows detailed information about the selected post
  3. Press [EXIT] to exit the 7 day TV Guide.

only for models with recording function

USB Record - Digital mode*

Built into this television is a USB record facility. This function is available in Digital mode when used in conjunction with a compatible USB memory stick or USB Hard drive. The benefits of this are as follows:

  • Pause live TV and then playback, fast forward and rewind (up to live TV).
  • One button record, if you decide you want to record the current programme.
  • Easy programmable recording from the 7 day TV Guide

Due to the nature of the product, it is necessary to use a high speed USB memory stick (as the TV reads from and writes to the memory stick at the same time, some memory sticks may not be suitable).

Minimum Specification - USB Memory Stick

Pause Live TV (Time Shift)*

Pausing Live TV is very simple.

  • Press the play/pause button and the television will pause and the live content will be recorded. To resume watching press play/pause again.
  • Press fast forward to go forward in a recording (i.e. to skip adverts).
  • Press fast rewind to go back in a recording (i.e. if you fast forwarded too far).
Tip: When you switch the TV to standby or change channel the Time Shift memory is wiped. To restart time shift you must press play/pause button.

One Button Record

At any point in time you may decide to record the current channel that you are watching. To do this you need to press the [REC] button.

Tip: This television contains one TV tuner, therefore it can only record the channel you are watching or record one channel while the television is in standby mode.
Note: USB record function is only available in Digital TV mode. Due to copyright laws and illegal copying/recording it is not possible to record to/from any other input/output source.

only for devices with built in PVR function

HDR (High Dynamic Range)

CHANNEL

Only for devices with built in PVR function

NETWORK

NOTE: For connecting to the Internet with a wired connection, connect a Cat 5/Ethernet cable (not included) from the TV to your broadband modem/router.
NOTE: The connection process may take a few minutes, please be patient. Every time the TV is then powered on it will automatically connect to the network, this may also take some time.

TIME

LOCK

SETUP

only for devices with built in PVR function

NOTE: The TV will automatically search for new releases of software every time it is turned on. If new software is found, it will ask you if you would like to download and install it. If you select “Yes” the TV will upgrade to the latest software.
WARNING: Do not turn off the TV’s power until the upgrade is complete!

HDMI CEC must be supported by connected device.