|
|

|
|

|
|

|
|

|
|

|
.png)


|
||

|
||

|
||

|
||

|
||

|
||

|
||

|


|
|


| Noise Reduction | Off, Low, Medium, High. | |
| Gamma | Changes the range of the colour reproduction. Low, Medium and High. | |
| Active Contrast | Allows for the contrast level to be adjusted automatically depending on picture content. ‘ON’ or ‘OFF’. | |
| Backlight | Switches optimization of the backlight and contrast of the picture. | Range: 1-100 |
| Red | Adjust the amount of red in the picture. | Range: 1-100 |
| Green | Adjust the amount of green in the picture. | Range: 1-100 |
| Blue | Adjust the amount of blue in the picture. | Range: 1-100 |
| CMS Hue | This is a standard to adjust the colour either more reddish or more bluish in tone. R/G/B/C/M | Range: -63 to 63 |
| CMS Value | A higher value makes the image brighter. A lower value makes the image darker. R/G/B/C/M | Range: -32 to 31 |
| CMS Saturation | Increases or decreases the saturation of a selected colour. R/G/B/C/M | Range: 0 to 15 |

|
|


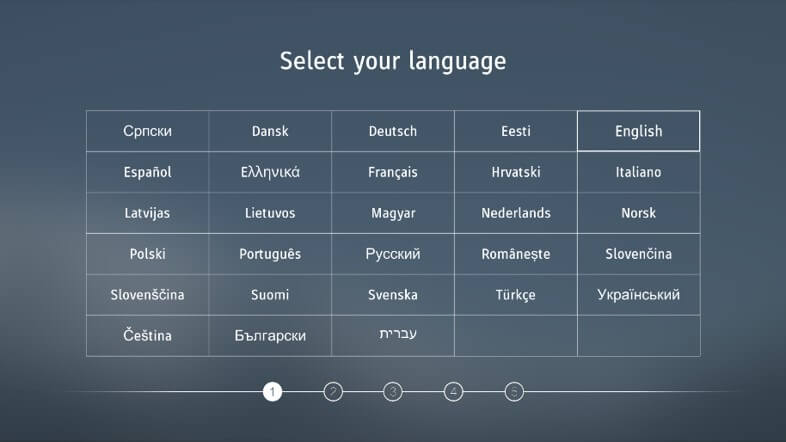
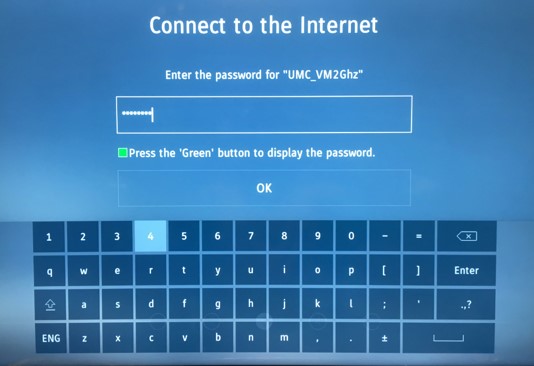
Capitals are selected by pressing caps key on the on-screen keyboard.

|
|
|||||||||||

|
|
|||||||||||

|
|
|||||||||||||
|
|
|||||||||||||


Key1234 |
|


 |
||

| ||

|
||

|
||
|
|
||
|
|
||

|
||

|
||
 |
 |
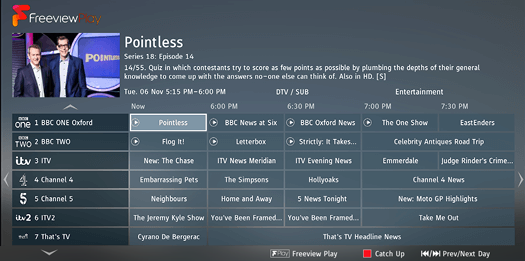
To be recorded on Catch Up. |
| Already recorded on Catch Up. | |
| Catch Up is only applicable to sets with Freeview Play. | |

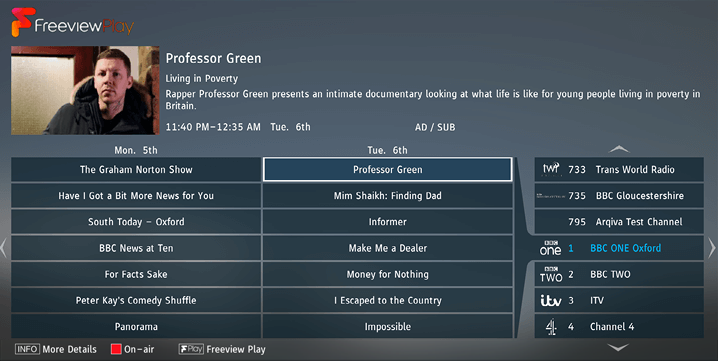
Watch now will only appear if the symbol ![]() appears on the programme name. This means that it has already been recorded by an on-demand player. When selected the programme will playback using the on-demand player for the channel.
appears on the programme name. This means that it has already been recorded by an on-demand player. When selected the programme will playback using the on-demand player for the channel.


|
|

_cs5_APPS.png)
|
Media |
Codec |
Resolution |
Bit Rate |
File Extension |
|
Film |
MPEG1/2 |
1080P@60fps |
80Mbps |
".DAT, .VOB, .MPG, .MPEG,.ts, .trp, |
|
MPEG4 |
1080P@60fps |
40Mbps |
".MPG, .MPEG, .mp4, .mov, |
|
|
XviD |
1080P@60fps |
40Mbps |
.divx, .mp4, .mov, .avi, .mkv, .asf |
|
|
H.263 |
1080P@60fps |
40Mbps |
".mp4, .mov, .3gpp, .3gp, .av, |
|
|
H.264 |
"4096x2160@30fps |
135Mbps |
".flv, .mp4, .mov, .3gpp, .3gp, .ts, |
|
|
Motion JPEG |
1080P@30fps |
10Mbps |
".avi, .3gpp, .3gp, .mp4, .mov, |
|
|
VP8 |
1080P@60fps |
20Mbps |
.mkv, .webm |
|
|
HEVC |
4K2K@60fps |
100Mbps |
.mp4, .mov, .mkv, .ts, .trp, .tp |
|
|
VP9 |
4K2K@60fps |
100Mbps |
.mkv, .webm |
|
|
Media |
Codec |
Frequency |
Bit Rate |
File Extension |
|
Music |
MPEG1/2 Layer1, 2, 3 |
16KHz ~ 48KHz |
32Kbps ~ 320Kbps |
".mp3, .avi, .as, .mkv, .ts, .trp, .tp, |
|
AC3 |
"32KHz, 44.1KHz, |
32Kbps ~ 640Kbps |
".ac3, .avi, .mkv, .divx, .3gpp, |
|
|
EAC3 |
"32KHz, 44.1KHz, |
32Kbps ~ 6Mbps |
".ec3, .3gpp, .3gp, .mp4, .mov, |
|
|
AAC, HEAAC |
8KHz ~ 48KHz |
128bps ~ 320Kbps |
".aac, .avi, .mkv, .divx, .3gpp, |
|
|
VORBIS |
Up to 48KHz |
".mkv, .webm, .3gpp, .3gp, .mp4, |
||
|
DTS |
Up to 48KHz |
< 1.5Mbps |
".ts, .trp, .tp, .DAT, .VOB, .MPG , |
|
|
FLAC |
8KHz~96 KHz |
< 1.6Mbps |
.mkv, . ac |
|
|
Media |
Resolution |
File Extension |
||
|
Photo |
JPEG |
15360x8640, (1920x8 x 1080x8) |
Base-line |
.jpg/.jpeg |
|
1024x768 |
Progressive |
|||
|
PNG |
9600x6400 |
Non-interlace |
.png |
|
|
1200x800 |
Interlace |
|||
|
BMP |
9600x6400 |
.bmp |
||
|
MPO |
15360x8640, (1920x8 x 1080x8) |
Base-line |
.mpo |
|
|
1024x768 |
Progressive |
|||
|
GIF |
6400x4800 |
.gif |
||
|
Internal Subtitle |
File Extension |
Container |
Subtitle Codec |
|
.mp4 |
MP4 |
DVD Subtitle, UTF-8 Plain Text |
|
|
.mkv |
MKV |
"ASS, SSA, UTF-8 Plain |
|
|
.avi |
AVI(1.0, 2.0) |
XSUB, XSUB+ |
|
|
External Subtitle |
File Extension |
Subtitle Parser |
Remark |
|
.srt |
SubRip |
||
|
.ssa/ .ass |
SubStation Alpha |
||
|
.smi |
SAMI |
||
|
.sub |
SubViewer, Micro DVD, DVD Subtitle System, Subldx (VobSub) |
SubViewer 1.0 & 2.0 Only |
|
|
.txt |
TMPlayer |