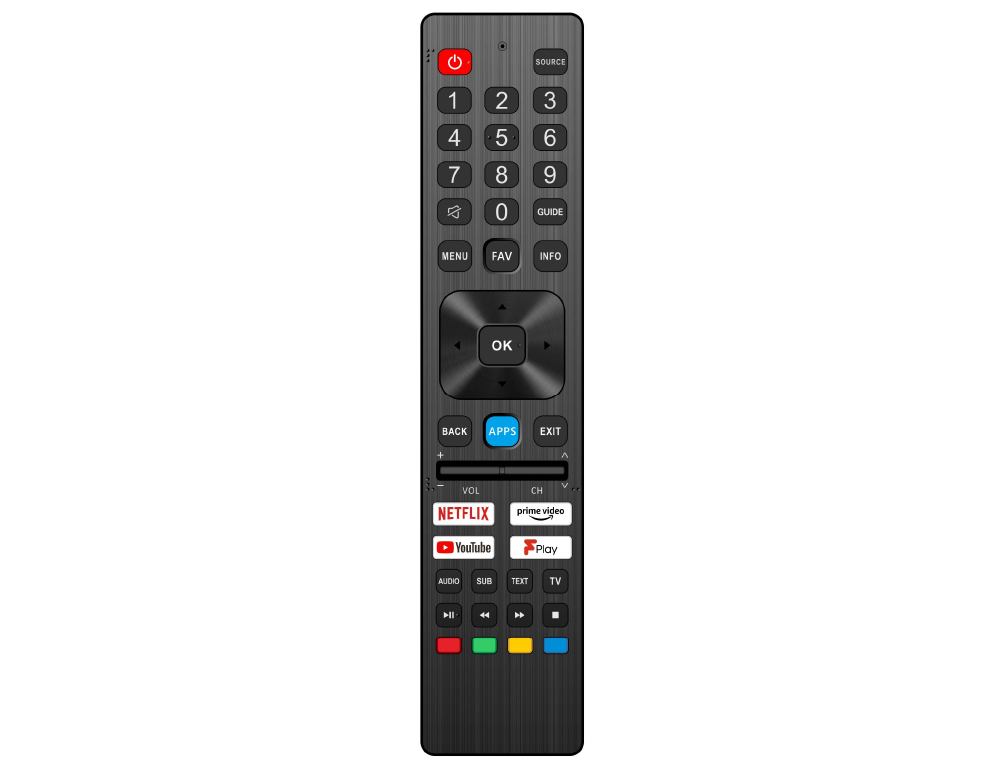
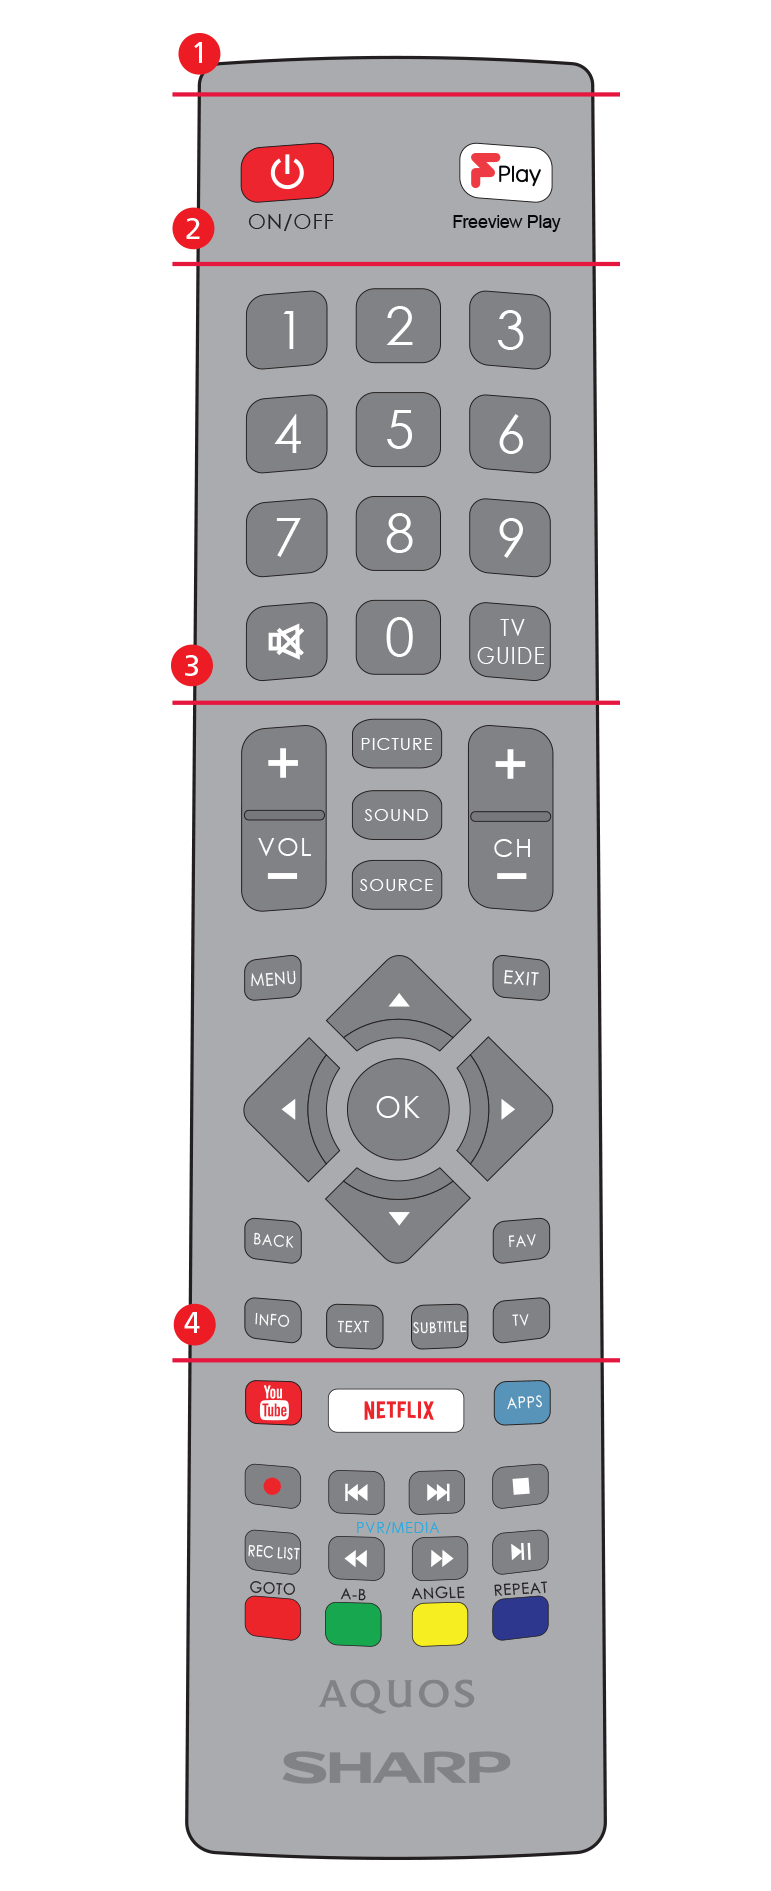
 STANDBY – Switch on TV when in standby or vice versa.
 MUTE – Mute the sound or vice versa.
 – To return to the previous channel viewed.
 – To restart the current chapter
 – To advance forward to the next chapter
 – To stop the playback
  – To play in fast rewind mode.
 – To play in fast forward mode.
 – To play/pause
1 - available only with PVR function
(stand-by) – Schakelt de tv in wanneer in stand-by en andersom. (dempen) - Dempt het geluid of schakelt het geluid weer in. - Media afspelen/pauzeren. - Snel terugspoelen. - Snel vooruit spoelen. - Afspelen onderbreken.
(standby) – Tænd for TV’et, når det er i standby eller sluk det. (lydløs) - slår lyden til eller fra. – Afspil/sæt medie på pause. – Afspil i hurtig tilbagespoling. – Afspil i hurtig fremadspoling. – Stop afspilningen.
(pohotovostní) – zapnutí televize v pohotovostním režimu nebo její vypnutí. (ztlumení) – ztlumí zvuk nebo ho znovu zapne. – přehrávání/pozastavení médií. – přehrávání v režimu rychlého přehrávání pozpátku. – přehrávání v režimu rychlého přehrávání vpřed. – zastavení přehrávání.
(Stanje pripravnosti) – uključuje televizor kad se nalazi u stanju pripravnosti ili obratno. (prigušivanje) – prigušuje ili uključuje zvuk. – reprodukcija/pauziranje multimedije. – za reprodukciju u načinu brzog premotavanja. – za reprodukciju u načinu rada “brzo naprijed”. – zaustavljanje reprodukcije.
(Режим на готовност) – включване/изключване на телевизора от/в режим на готовност. (Без звук) – изключване или включване на звука. – възпроизвеждане/пауза на мултимедиен файл. – възпроизвеждане в режим бързо превъртане назад. – възпроизвеждане в режим бързо превъртане напред. – прекратяване на възпроизвеждането.
(standby) – Liga o televisor quando está em modo de espera (standby) ou vice-versa. (silenciar) – Silencia o som ou vice-versa. – Reproduzir/fazer uma pausa no conteúdo multimédia. - Para reproduzir em modo de retroceder rápido. - Para reproduzir em modo de avançar rápido. – Parar a reprodução. STANDBY – Switch on TV when in standby or vice versa. MUTE – Mute the sound or vice versa. – To return to the previous channel viewed. – To restart the current chapter – To advance forward to the next chapter – To stop the playback – To play in fast rewind mode. – To play in fast forward mode. – To play/pause
1 - available only with PVR function


|
||

|
||

|
||

|
||

|
||

|
||

|
||

|


|
|


| Noise Reduction | Off, Low, Medium, High. | |
| Gamma | Changes the range of the colour reproduction. Low, Medium and High. | |
| Active Contrast | Allows for the contrast level to be adjusted automatically depending on picture content. ‘ON’ or ‘OFF’. | |
| Backlight | Switches optimization of the backlight and contrast of the picture. | Range: 1-100 |
| Red | Adjust the amount of red in the picture. | Range: 1-100 |
| Green | Adjust the amount of green in the picture. | Range: 1-100 |
| Blue | Adjust the amount of blue in the picture. | Range: 1-100 |
| CMS Hue | This is a standard to adjust the colour either more reddish or more bluish in tone. R/G/B/C/M | Range: -63 to 63 |
| CMS Value | A higher value makes the image brighter. A lower value makes the image darker. R/G/B/C/M | Range: -32 to 31 |
| CMS Saturation | Increases or decreases the saturation of a selected colour. R/G/B/C/M | Range: 0 to 15 |

|
|


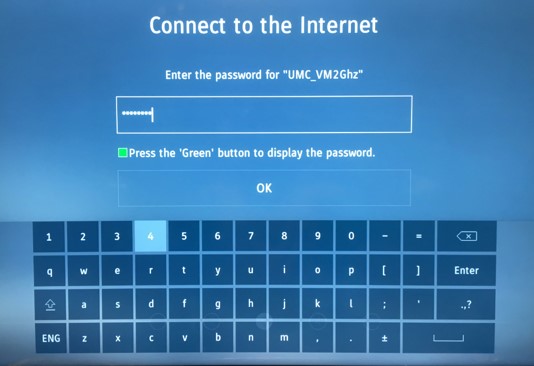
Capitals are selected by pressing caps key  on the on-screen keyboard.
.png)

|
|
|||||||||||

|
|
|||||||||||

|
|
|||||||||||||
|
|
|||||||||||||


(standby) – Switch on the TV when in standby or vice versa. (mute) – Mutes the sound or vice versa. – Play/pause media. – Play in fast rewind mode. – Play in fast forward mode. – Stop playback.
|
|
||
|
|
||
|
|
||
|
|
||
|
|
||
|
|
||
|
|
||
|
|
|
|
| Noise Reduction | Off, Low, Medium, High. | |
| Gamma | Changes the range of the colour reproduction. Low, Medium and High. | |
| Active Contrast | Allows for the contrast level to be adjusted automatically depending on picture content. ‘ON’ or ‘OFF’. | |
| Backlight | Switches optimization of the backlight and contrast of the picture. | Range: 1-100 |
| Red | Adjust the amount of red in the picture. | Range: 1-100 |
| Green | Adjust the amount of green in the picture. | Range: 1-100 |
| Blue | Adjust the amount of blue in the picture. | Range: 1-100 |
| CMS Hue | This is a standard to adjust the colour either more reddish or more bluish in tone. R/G/B/C/M | Range: -63 to 63 |
| CMS Value | A higher value makes the image brighter. A lower value makes the image darker. R/G/B/C/M | Range: -32 to 31 |
| CMS Saturation | Increases or decreases the saturation of a selected colour. R/G/B/C/M | Range: 0 to 15 |
|
|
Capitals are selected by pressing caps key on the on-screen keyboard.
|
|
|||||||||||
|
|
|||||||||||
|
|
|||||||||||||
|
|
|||||||||||||
|
|
||
|
|
||
|
|
||
|
|
||
|
|
||
|
|
||
|
|
||
|
|
|
|
| Noise Reduction | Off, Low, Medium, High. | |
| Gamma | Changes the range of the colour reproduction. Low, Medium and High. | |
| Active Contrast | Allows for the contrast level to be adjusted automatically depending on picture content. ‘ON’ or ‘OFF’. | |
| Backlight | Switches optimization of the backlight and contrast of the picture. | Range: 1-100 |
| Red | Adjust the amount of red in the picture. | Range: 1-100 |
| Green | Adjust the amount of green in the picture. | Range: 1-100 |
| Blue | Adjust the amount of blue in the picture. | Range: 1-100 |
| CMS Hue | This is a standard to adjust the colour either more reddish or more bluish in tone. R/G/B/C/M | Range: -63 to 63 |
| CMS Value | A higher value makes the image brighter. A lower value makes the image darker. R/G/B/C/M | Range: -32 to 31 |
| CMS Saturation | Increases or decreases the saturation of a selected colour. R/G/B/C/M | Range: 0 to 15 |
|
|
Capitals are selected by pressing caps key on the on-screen keyboard.
|
|
|||||||||||
|
|
|||||||||||
|
|
|||||||||||||
|
|
|||||||||||||
Key1234 |

|
Key1234 |
|
Key1234 |
|
Key1234 |
|
Key1234 |
|
Key1234 |
|
Key1234 |
|
Key1234 |
|
Key1234 |
|
Key1234 |
|
Key1234 |
|
Key1234 |
|
Key1234 |
|
Key1234 |
|
Key1234 |
|
The TV control stick is located on the back of the TV. You can use it instead of remote control to control most of the functions of your TV.
From this menu, you can switch your TV input signal to different source/connected device.
To switch between the different input/connections.
a) Using the buttons on the remote control:
Press [SOURCE/ ] - The source menu will appear.
Press [◄] or [►] to select the input you require.
Press [OK].
b) Using the TV control stick:
Shortly press control stick to enter menu.
Press control stick down and navigate cursor to SOURCES menu.
Shortly press control stick to enter SOURCES menu.
with control stick choose the input/source you require.
By short press of control stick, you will change input/source to the one selected.
|
|
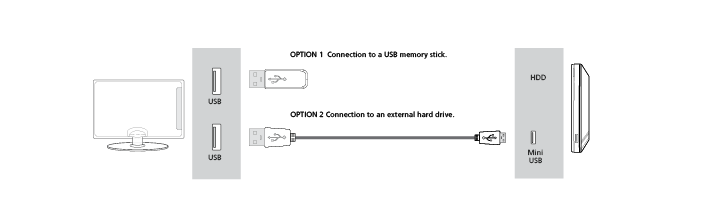
USB |
|
|
HDMI 1, 2, 3 (ARC) |
|
|
SD Card reader |
|
|
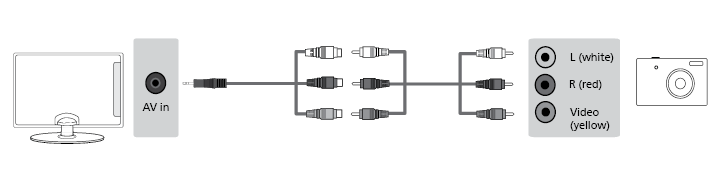
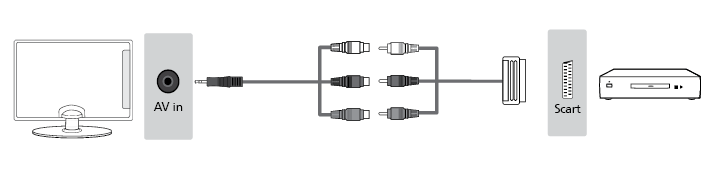
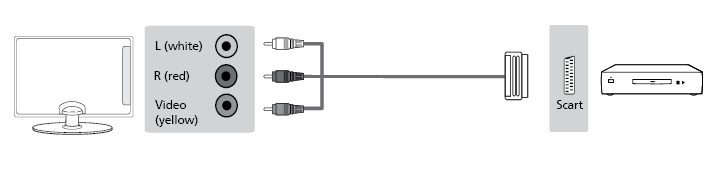
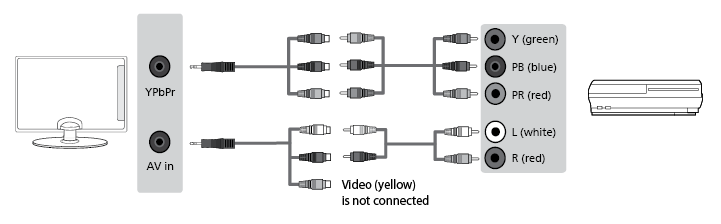
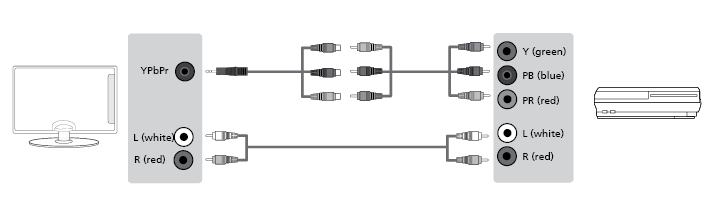
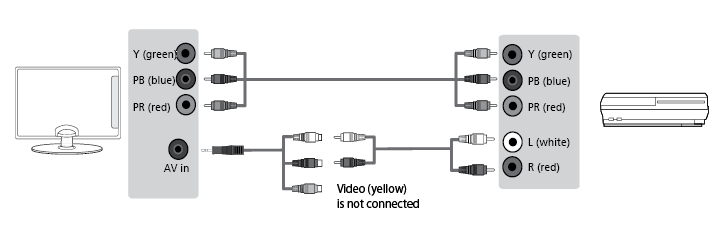
R/L - Video & YPbPr audio In |
|
|
Video (CVBS) VIDEO input |
|
|
Component / YPbPr |
|
|
CI Card IN |
|
|
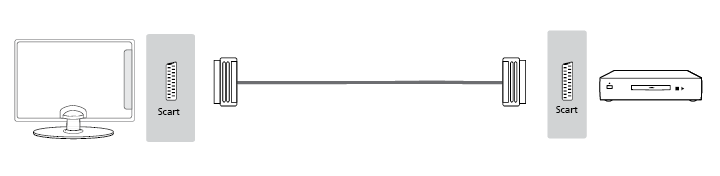
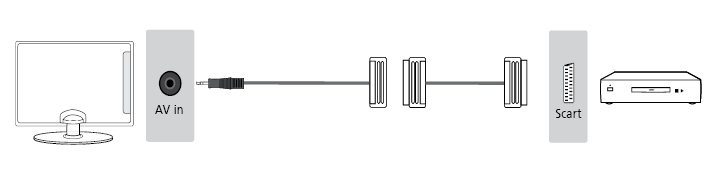
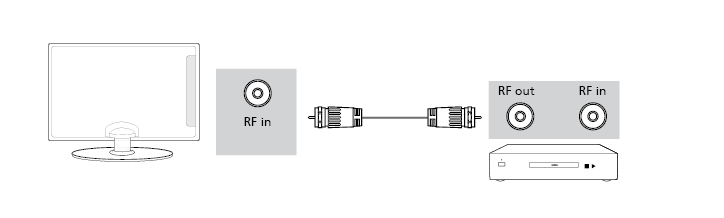
RF In |
|
|
Sat In |
|
|
Digital Optical Audio Out |
|
|
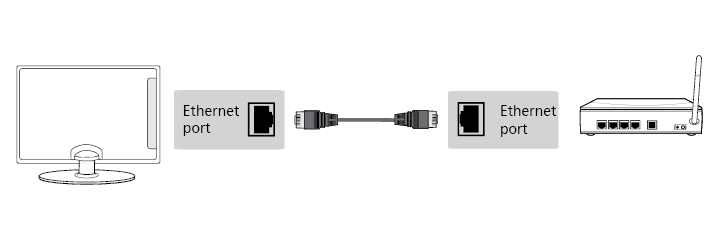
RJ 45 |
|
|
HEADPHONES |
|
|
SERVICE |
Contains the most commonly used apps for quick and easy access.
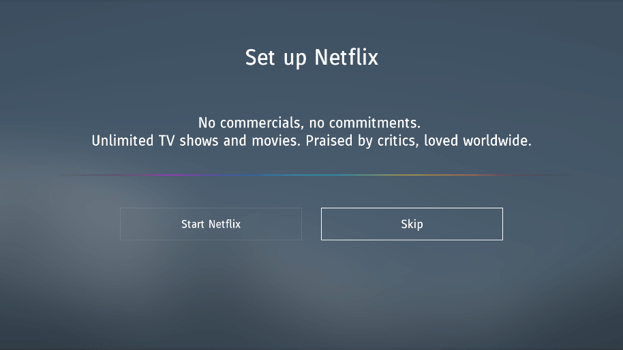
World’s leading Internet television network. It is offering thousands of movies and TV shows, including original series, documentaries and feature films. Members can play, pause and resume watching, all without commercials or commitments. You can log in to this application with your existing Netflix account. If you do not have Netflix account yet, you can register via this app or via official Netflix website.
Videosharing app allows you to discover and watch originally-created videos.
Opens the Sharp SMART portal.
Application for accessing websites via the internet. Navigation in the browser:
Contains the most commonly used apps for quick and easy access.
World’s leading Internet television network. It is offering thousands of movies and TV shows, including original series, documentaries and feature films. Members can play, pause and resume watching, all without commercials or commitments. You can log in to this application with your existing Netflix account. If you do not have Netflix account yet, you can register via this app or via official Netflix website.
Videosharing app allows you to discover and watch originally-created videos.
Opens the Sharp SMART portal.
Application for accessing websites via the internet. Navigation in the browser:
Multimedia mode offers the playback of various content saved on a USB Memory Stick. The content will be divided into various file types: Photo, Music and Movie.
The ‘ALL’ option will show and allow you to play all types of supported content.
Allows you to view content from your smart phone or tablet on the TV screen. Miracast is formed using Wi-Fi Direct, so access to a Wi-Fi network is not needed. You can share content from your smartphone or tablet based on Android 4.4 and newer system.
Automatically searches for digital media servers (DMS) connected to your home network and enables the playback and rendering of content from media servers
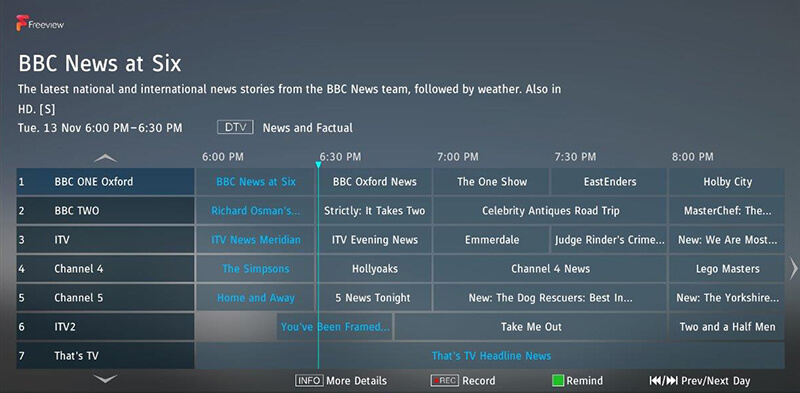
To activate the channel list, press the [OK] button when watching TV. This allows you to quickly select a channel to watch – select the desired channel by using the up and down arrows or the CH +/- buttons on the remote control. Press [OK] to watch.
While in this menu the following two options can be selected:
To access the SMART portal Menu at any time press the NET+ button on the remote control or select it from More Apps menu.
Navigate the menu using the scroll ▲/▼/◄/► buttons. To confirm the item you wish to play/view press [OK] button. For ‘one-step’ back press [Menu] button, and to access additional functions use the coloured buttons. To leave SMART portal press [EXIT] button.
To access the AQUOS NET+ Menu at any time press the NET+ button on the remote control or select it from More Apps menu.
Navigate the menu using the scroll ▲/▼/◄/► buttons. To confirm the item you wish to play/view press [OK] button. For ‘one-step’ back press [Menu] button, and to access additional functions use the coloured buttons. To leave AQUOS NET+ press [EXIT] button.
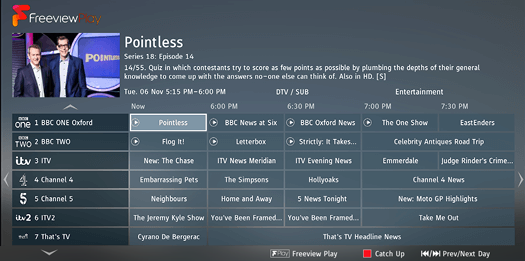
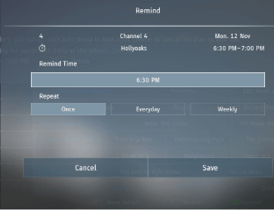
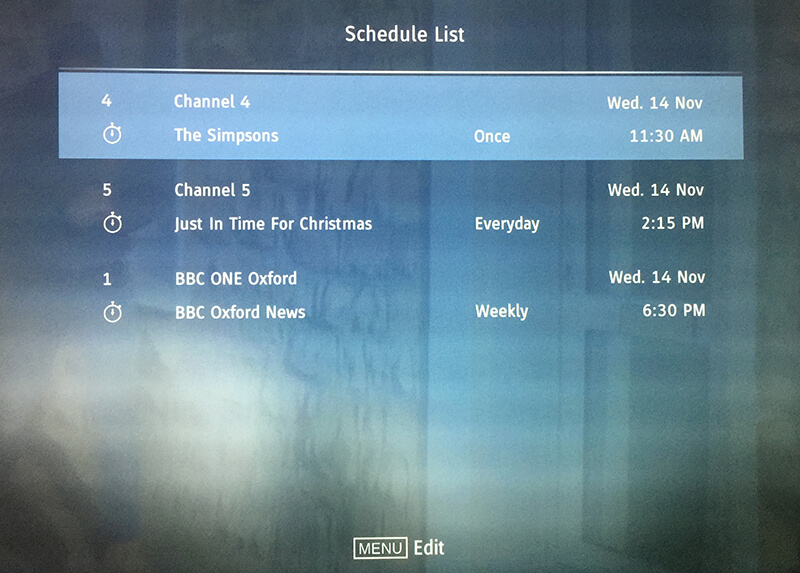
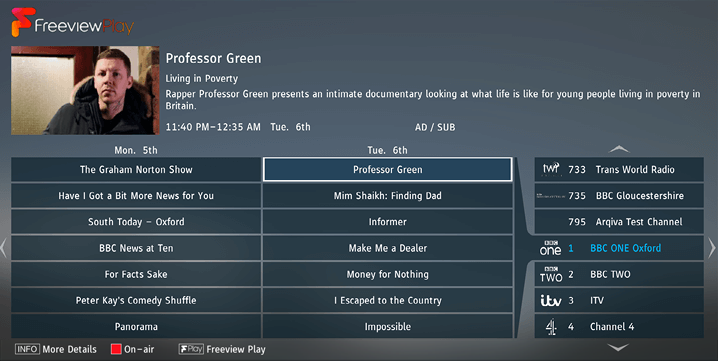
TV Guide is available in Digital TV mode. It provides information about forthcoming programmes (where supported by the Digital channel). You can view the start and end time of all programmes and on all channels for the next 7 days and set reminders.
/ to view the previous/next day’s list of programmes.Built into this television is a USB record facility. This function is available in Digital mode when used in conjunction with a compatible USB memory stick or USB Hard drive. The benefits of this are as follows:
Due to the nature of the product, it is necessary to use a high speed USB memory stick (as the TV reads from and writes to the memory stick at the same time, some memory sticks may not be suitable).
Minimum Specification - USB Memory Stick
Pausing Live TV is very simple.
At any point in time you may decide to record the current channel that you are watching. To do this you need to press the [REC] button.
HDR video removes some of the limitations of a standard video signal and shows the image built from a wider gamut of colour and brightness.
|
|
|

|
|

|
|

|
|

|
|

|


|
|
||
|
|
||
|
|
||
|
|
||
|
|
||
|
|
||
|
|
||
|
|
|
|
| Noise Reduction | Off, Low, Medium, High. | |
| Gamma | Changes the range of the colour reproduction. Low, Medium and High. | |
| Active Contrast | Allows for the contrast level to be adjusted automatically depending on picture content. ‘ON’ or ‘OFF’. | |
| Backlight | Switches optimization of the backlight and contrast of the picture. | Range: 1-100 |
| Red | Adjust the amount of red in the picture. | Range: 1-100 |
| Green | Adjust the amount of green in the picture. | Range: 1-100 |
| Blue | Adjust the amount of blue in the picture. | Range: 1-100 |
| CMS Hue | This is a standard to adjust the colour either more reddish or more bluish in tone. R/G/B/C/M | Range: -63 to 63 |
| CMS Value | A higher value makes the image brighter. A lower value makes the image darker. R/G/B/C/M | Range: -32 to 31 |
| CMS Saturation | Increases or decreases the saturation of a selected colour. R/G/B/C/M | Range: 0 to 15 |
|
|
Capitals are selected by pressing caps key on the on-screen keyboard.
|
|
|||||||||||
|
|
|||||||||||
|
|
|||||||||||||
|
|
|||||||||||||
|
|
||
|
|
||
|
|
||
|
|
||
|
|
||
|
|
||
|
|
||
|
|
|
|
| Noise Reduction | Off, Low, Medium, High. | |
| Gamma | Changes the range of the colour reproduction. Low, Medium and High. | |
| Active Contrast | Allows for the contrast level to be adjusted automatically depending on picture content. ‘ON’ or ‘OFF’. | |
| Backlight | Switches optimization of the backlight and contrast of the picture. | Range: 1-100 |
| Red | Adjust the amount of red in the picture. | Range: 1-100 |
| Green | Adjust the amount of green in the picture. | Range: 1-100 |
| Blue | Adjust the amount of blue in the picture. | Range: 1-100 |
| CMS Hue | This is a standard to adjust the colour either more reddish or more bluish in tone. R/G/B/C/M | Range: -63 to 63 |
| CMS Value | A higher value makes the image brighter. A lower value makes the image darker. R/G/B/C/M | Range: -32 to 31 |
| CMS Saturation | Increases or decreases the saturation of a selected colour. R/G/B/C/M | Range: 0 to 15 |
|
|
Capitals are selected by pressing caps key on the on-screen keyboard.
|
|
|||||||||||
|
|
|||||||||||
|
|
|||||||||||||
|
|
|||||||||||||
Key1234 |

|
Key1234 |
|
Key1234 |
|
Key1234 |

|


 |
||

| ||

|
||

|
||
|
|
||
|
|
||

|
||

|
||
 |
 |
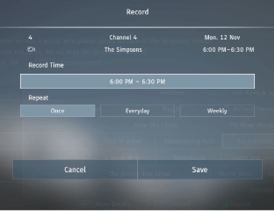
To be recorded on Catch Up. |
| Already recorded on Catch Up. | |
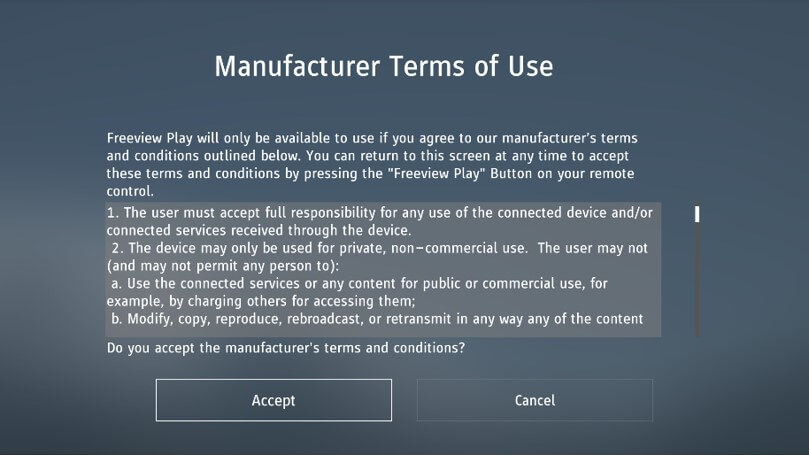
| Catch Up is only applicable to sets with Freeview Play. | |
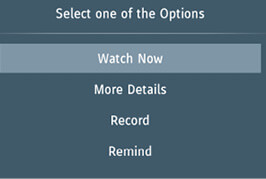
Watch now will only appear if the symbol ![]() appears on the programme name. This means that it has already been recorded by an on-demand player. When selected the programme will playback using the on-demand player for the channel.
appears on the programme name. This means that it has already been recorded by an on-demand player. When selected the programme will playback using the on-demand player for the channel.


|
|
_cs5_APPS.png)
|
Media |
Codec |
Resolution |
Bit Rate |
File Extension |
|
Film |
MPEG1/2 |
1080P@60fps |
80Mbps |
".DAT, .VOB, .MPG, .MPEG,.ts, .trp, |
|
MPEG4 |
1080P@60fps |
40Mbps |
".MPG, .MPEG, .mp4, .mov, |
|
|
XviD |
1080P@60fps |
40Mbps |
.divx, .mp4, .mov, .avi, .mkv, .asf |
|
|
H.263 |
1080P@60fps |
40Mbps |
".mp4, .mov, .3gpp, .3gp, .av, |
|
|
H.264 |
"4096x2160@30fps |
135Mbps |
".flv, .mp4, .mov, .3gpp, .3gp, .ts, |
|
|
Motion JPEG |
1080P@30fps |
10Mbps |
".avi, .3gpp, .3gp, .mp4, .mov, |
|
|
VP8 |
1080P@60fps |
20Mbps |
.mkv, .webm |
|
|
HEVC |
4K2K@60fps |
100Mbps |
.mp4, .mov, .mkv, .ts, .trp, .tp |
|
|
VP9 |
4K2K@60fps |
100Mbps |
.mkv, .webm |
|
|
Media |
Codec |
Frequency |
Bit Rate |
File Extension |
|
Music |
MPEG1/2 Layer1, 2, 3 |
16KHz ~ 48KHz |
32Kbps ~ 320Kbps |
".mp3, .avi, .as, .mkv, .ts, .trp, .tp, |
|
AC3 |
"32KHz, 44.1KHz, |
32Kbps ~ 640Kbps |
".ac3, .avi, .mkv, .divx, .3gpp, |
|
|
EAC3 |
"32KHz, 44.1KHz, |
32Kbps ~ 6Mbps |
".ec3, .3gpp, .3gp, .mp4, .mov, |
|
|
AAC, HEAAC |
8KHz ~ 48KHz |
128bps ~ 320Kbps |
".aac, .avi, .mkv, .divx, .3gpp, |
|
|
VORBIS |
Up to 48KHz |
".mkv, .webm, .3gpp, .3gp, .mp4, |
||
|
DTS |
Up to 48KHz |
< 1.5Mbps |
".ts, .trp, .tp, .DAT, .VOB, .MPG , |
|
|
FLAC |
8KHz~96 KHz |
< 1.6Mbps |
.mkv, . ac |
|
|
Media |
Resolution |
File Extension |
||
|
Photo |
JPEG |
15360x8640, (1920x8 x 1080x8) |
Base-line |
.jpg/.jpeg |
|
1024x768 |
Progressive |
|||
|
PNG |
9600x6400 |
Non-interlace |
.png |
|
|
1200x800 |
Interlace |
|||
|
BMP |
9600x6400 |
.bmp |
||
|
MPO |
15360x8640, (1920x8 x 1080x8) |
Base-line |
.mpo |
|
|
1024x768 |
Progressive |
|||
|
GIF |
6400x4800 |
.gif |
||
|
Internal Subtitle |
File Extension |
Container |
Subtitle Codec |
|
.mp4 |
MP4 |
DVD Subtitle, UTF-8 Plain Text |
|
|
.mkv |
MKV |
"ASS, SSA, UTF-8 Plain |
|
|
.avi |
AVI(1.0, 2.0) |
XSUB, XSUB+ |
|
|
External Subtitle |
File Extension |
Subtitle Parser |
Remark |
|
.srt |
SubRip |
||
|
.ssa/ .ass |
SubStation Alpha |
||
|
.smi |
SAMI |
||
|
.sub |
SubViewer, Micro DVD, DVD Subtitle System, Subldx (VobSub) |
SubViewer 1.0 & 2.0 Only |
|
|
.txt |
TMPlayer |


 STANDBY – Switch on TV when in standby or vice versa.
 MUTE – Mute the sound or vice versa.
 – To return to the previous channel viewed.
 – To restart the current chapter
 – To advance forward to the next chapter
 – To stop the playback
  – To play in fast rewind mode.
 – To play in fast forward mode.
 – To play/pause
1 - available only with PVR function
Vol+ Volume up and menu right
Vol- Volume down and menu left
CH+ Programme/Channel up and menu up
CH- Programme/Channel down and menu down
MENU Displays Menu/OSD
SOURCE Displays the input source menu
STANDBY Standby Power On/Off
for TV with buttons
TV control stick is located on the lower left corner of back side of the TV. You can use it instead of remote control to control most of the functions of your TV.
While TV is in standby mode:
While watching TV:
While in menu:
To switch between the different input/connections.
a) Using the buttons on the remote control:
 ] - The source menu will appear.
b1) Using the buttons* on the Television:
b2) Using the TV control stick*:
optional
World’s leading Internet television network. It is offering thousands of movies and TV shows, including original series, documentaries and feature films. Members can play, pause and resume watching, all without commercials or commitments. You can log in to this application with your existing Netflix account. If you do not have Netflix account yet, you can register via this app or via official Netflix website.
Videosharing app allows you to discover and watch originally-created videos.
Contains the most commonly used apps for quick and easy access.
From this menu, you can switch your TV input signal to different source/connected device.
The ‘File Option’ will show and allow you to play all types of supported content.
This function is only available on selected smartphones and notebooks.
Only for devices with built in PVR function
only for devices with built in PVR function
HDMI CEC must be supported by connected device.
Only for devices with built in PVR function
only for devices with built in PVR function
HDMI CEC must be supported by connected device.
TV Guide is available in Digital TV mode. It provides information about forthcoming programmes (where supported by the Digital channel). You can view the start and end time of all programmes and on all channels for the next 7 days and set reminders.
only for models with recording function
Built into this television is a USB record facility. This function is available in Digital mode when used in conjunction with a compatible USB memory stick or USB Hard drive. The benefits of this are as follows:
Due to the nature of the product, it is necessary to use a high speed USB memory stick (as the TV reads from and writes to the memory stick at the same time, some memory sticks may not be suitable).
Minimum Specification - USB Memory Stick
Pausing Live TV is very simple.
At any point in time you may decide to record the current channel that you are watching. To do this you need to press the [REC] button.
only for devices with built in PVR function
Only for devices with built in PVR function
only for devices with built in PVR function
HDMI CEC must be supported by connected device.


